7 years in the making

Speaking with one of my children the other day, not that he’s a child any longer but a 28 year old Nissan Skyline driver, and mentioned that I’m intending to rebuild the the B5234T bottom end over Christmas break and he was like, really! already!

It doesn’t seem so long ago that I commenced this project but it has actually been 7 years since the original build in 2013. I’ve no idea where that 7 years and 90,000 Klm’s went, but I do know its been a blast! 

None of my children had licences when I bought Ovlov in 2008, she was very original with a 140,000 Klms on the clock and I’m fairly sure the only modification was an aftermarket chip.

Then in 2013 I completed the original rebuild with a 19T turbo upgrade and original 5 speed M56 gearbox. Since then we’ve attended countless track days, tried 4 different configurations of turbo charger, experienced an insurmountable number of wide open throttle blasts, completed 2 dyno runs, changed the gearbox twice (none of which broke) and generally tinkered and played with just about every imaginable aspect of the vehicle. Ignition voltage boosters, an LSD, larger intake pipes, rechipped/tuned twice, larger exhaust, 3 inch DP, suspension mods, Intercoolers, radiators, wheel/rim changes, it’s a bloody long list.

Ive heard it said that the Volvo 5 cylinder engines can be thought of as a little frail at times but given my experience I can honestly say that if you prepare and maintain these engines properly they are an awesome engine. I can personally vouch for the fact they survive a significant flogging over an extended period of time. Maybe flogging is not the best word, but you know what I mean. With forged pistons and rods we’ve basically averaged a 300+ wheel horsepower output during this time, which the engine has held up to without major issue.

And with that in mind, I have decided that it’s time to rebuild the bottom end, which includes main bearings and rod bearings, a changed oil pump and the usual bits and pieces that would be appropriate to replace at this time, particularly items like engine mounts, subframe bushes etc. I can’t say for sure that I know that anything is definitely failing except for an inkling of a change in sound on cold starts…..just momentary. And in the spirit of this continued journey and keeping her alive, I think it’s fitting to take on some well deserved maintenance.

And in all fairness to the strength of the B5234T, the TD06 SL2 20G turbo comes in with such a flurry of boost, an experience that I’ve not refrained from enjoying, it is entirely reasonable to expect it may have taken a toll on the main or con-rod bearings.

In considering this maintenance I was also pondering removal of the cylinder head to clean up the valve seats etc but I’m not convinced there would be much to gain here. I’ve compression tested the engine and all cylinders are reading within a 5% variation of 170 psi, which is well within acceptable performance limits.

There are a couple of other niggly issues I’ll attempt to address at the same time, some suspension noise over harsh bumps and some fuel leaking around the upper tank area, particularly noticeable if hooning around a racetrack with a reasonable amount of fuel on board. I’ll also take the time to add an oil pressure gauge, something I’ve often felt would be worth having given the expectations around track days and managing engine longevity.

Until next time, happy modding!


It’s a wrap!

Can’t say I’ve seriously considered taking on the task of vinyl wrapping this old girl, until recently. It wasn’t so long ago I’d been thinking about purchasing another vehicle. Maybe something with a rotary engine or  serious track day performance, like a Renault RS of sorts.

Then comes along a world pandemic and everything changes, or stays the same, depending how you look at it.

And so, in the era of social distancing, limited recreational opportunities and the possibility of a reduced income, spending a few dollars less on recreating the old girl again seemed like the preferred option.

I’m new to the world or wrapping and the process has been a massive learning curve. Trying to picture in your mind how the car will look given the multitude of  colour options was half the battle. Then you have a bunch of vinyl manufacturers, probably only 4 or 5 that come with recommendations, then you need to spend quite some time watching a few very good YouTube vids from auto wrappers.

And when the day arrives for you to apply your first panel to wrap, a whole bunch of nerves and anxious moments take hold as you commence a very steep learning curve into the world of automotive wrapping. I think the anxiety comes as your realise that you can very quickly make a complete botch of it in a very short time, and at something like $55 meter AU it’s a fast way to spend some cash.

You definitely need to taper your enthusiasm and penchant for perfectionism with reality. As one well known YouTube wrapper rightly mentioned, nothing is perfect in this world and sometimes you just have to deal with that. For the most part, I’m confident people will look at her and say she’s got a fairly decent wrap, but when you do it yourself you tend to remember those little bits and pieces that you weren’t entirely satisfied with.

And without descending into a philosophical treatise concerning the goal of perfectionism, I feel the goal of contentment is far more valuable. I know right, I’m making it sound as though I did a shit job! 🙂 Not at all!

I’ve used a 3M product called Atomic Teal Gloss 1080. Excellent quality product but does require some technique to apply this particular wrap. For example, don’t bother trying to wrap a panel in temps below 18 degrees C. It seems to be vulnerable to tearing in cooler temps. Lesson number 53 in automotive wrapping! Ok Maybe not #53, but there’s a lot to learn!

The old girl is about 60% wrapped and I’ve been averaging 1 panel per day. Estimated time to complete, another 7 days. Oh, and in case your wondering, that’s about 3 hours each day and not the whole day.

For those who may have been wondering, mechanically she is running brilliantly. We’ve not undertaken any serious mechanical work for quite some time and I’ve continued to drive her most days up until now.

Newly Wrapped

Interestingly, when photographing this colour wrap it more than often shows up as quite blue as in the picture below. The above greener tone in the first pic is more realistic but even this doesn’t really capture the depth of colour.

It’s been quite a few weeks now since finishing the wrap. Very happy with it overall! Would definitely do it all again, but maybe not for a while.

Thought I’d throw those last two pics to show what it would have looked like in a grey or black wrap. These colours were on my shortlist at the time.  I feel like the matt black would have been a cool option…. a little more aggressive look!

On The Road Again

2019_0630_13343400 (3)

On the Road Again after extensive work including some touches with the Foliatec Anthracite plasti dip paint on the wheels and bumpers. I’ve also removed the rear spoiler to go for a different look for a little while.

Took some time today to run Ovlov through her paces, the main interest being to check the Air Fuel Ratio under acceleration following installation of the newly updated ECU. The previous ECU was running quite lean at WOT with an AF ratio of 14ish. This occurred following the change to the Kinugawa 20G turbo.

It’s only a very short video but everything looks pretty good. Here’s a brief rundown on what you’ll see.

  • Left gauge: AFR drops to 10 ish during each instance of WOT. This may be considered running a little rich but this is good given Ovlov will be tracked again at some stage.
  • Middle gauge: Boost fluctuates a fair bit at various times and to be fair to the car I was feathering the throttle a little to avoid wheel spin. It’s only really in 3rd gear that you’ll see boost stabilize at a little over 20psi.
  • Right gauge: Measures Air temp at inter cooler input and inter cooler output. In that very short run you’ll see top ( temp in)  climb from 35 deg C to 100+ Deg C, whilst inter cooler output varies from 22deg C to 23 deg C. Thank God for inter coolers!
  • The digital gauge at the bottom is simply the engine temp @ 72 Deg C…. probably a little cooler than normal (It’s a cool 14 Deg day in Canberra today)
  • The blinking LEDs below the boost gauge indicate detonation. I’ve never really calibrated this unit so can only use it as a guide. All LEDs flash brightly when sensor identifies detonation. I thought it may be useful at one time but really it hasn’t proven to be.

On the road the car feels great. I particularly like the Ford Focus M66 gearbox ratios which feel a little closer than the Volvo M66 in the midrange. This could also be partly the result of the improved performance of the ECU upgrade which feels to have unleashed additional low and mid range performance.

Overall the car feels great to drive, extremely punch through the gears and also friendlier for day to day kind of traffic driving.

It’s that time again!

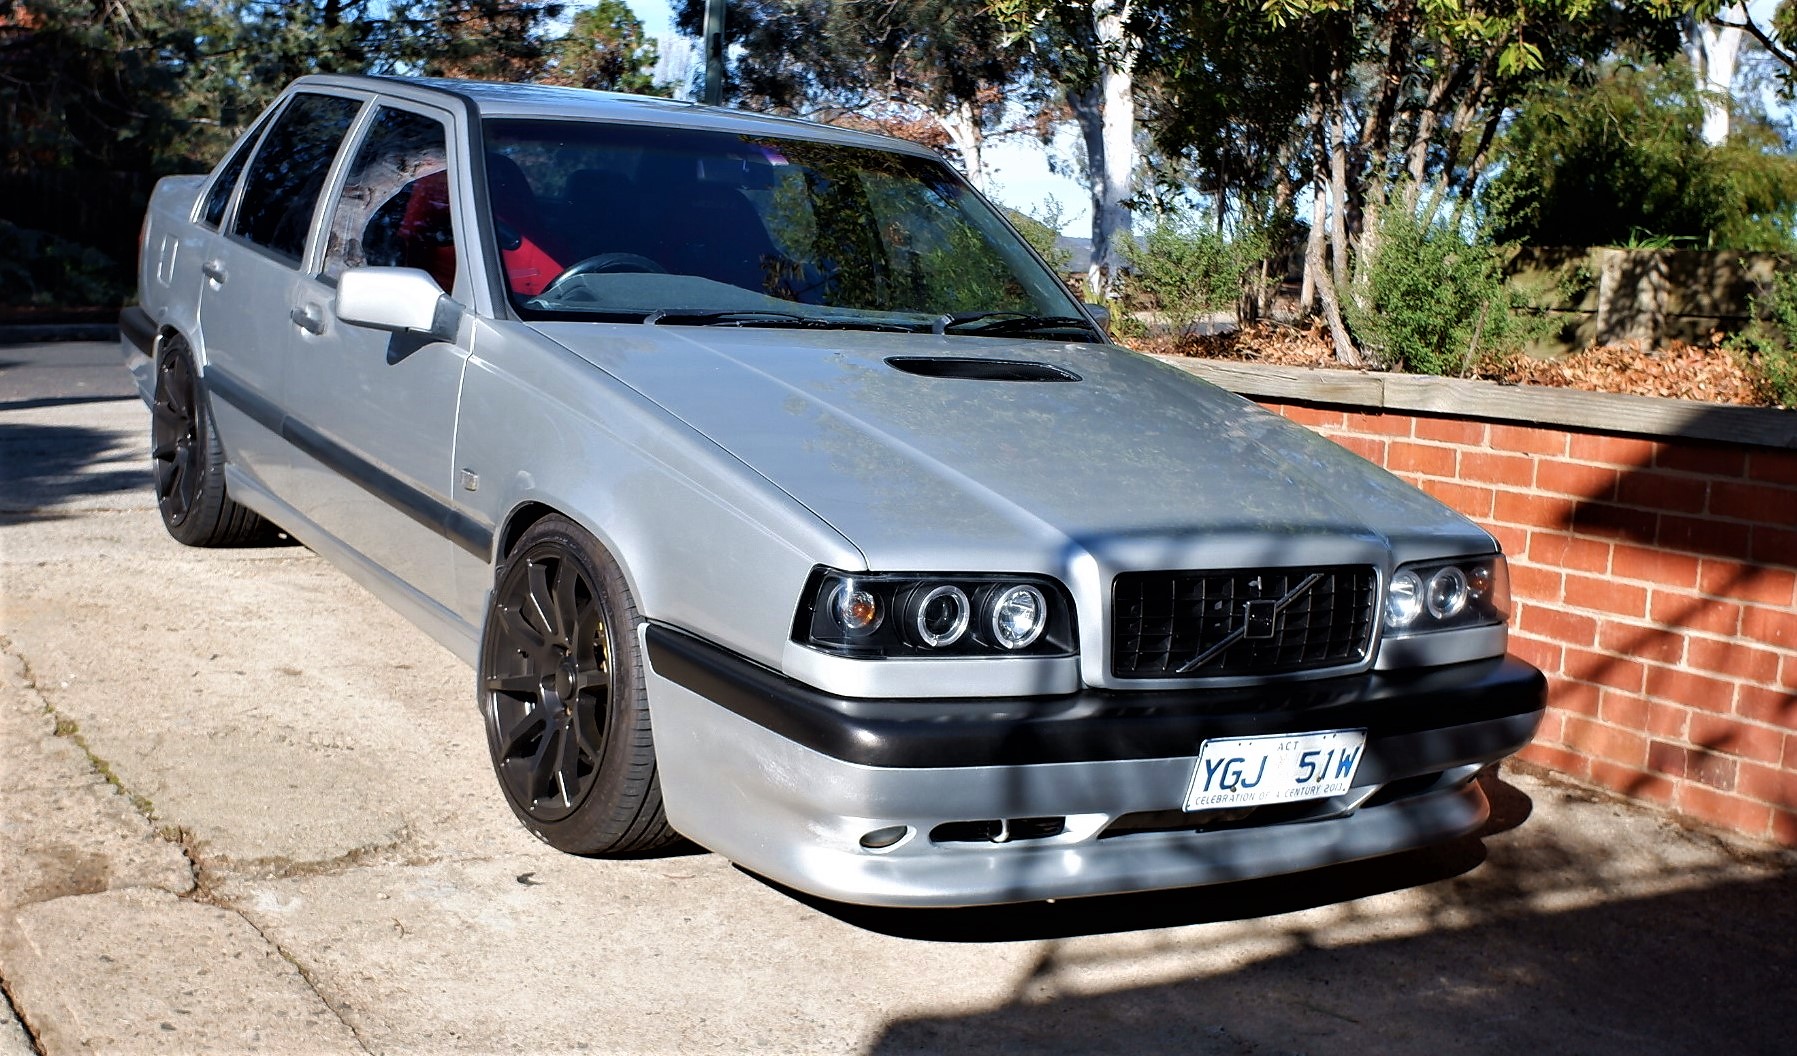
It must be close to 2 years since we’ve undertaken an extensive maintenance program on Ovlov. Since that time we’ve addressed some minor issues and a couple of more major ones, like broken turbos, but invariably we get to a point where I have a list of items to address which are more than just a weekend job. As such my most productive approach is to take some time off work and smash it all out in one go. Now is that time!

The current maintenance list consists of some rather insignificant things, like painted brake calipers which are starting to look atrocious and more significant items, like clutch plate and gearbox replacement. It seems on this occasion in 2019, we’ve managed to accumulate a longer list than we ordinarily might. Perhaps I’ve been remiss and somewhat neglectful of her daily care over the past couple of years, but then again, maybe I’ve just been too busy working for the man, paying the bills and attempting to keep the wife happy! Some of those things are far more achievable than others.

I was trying to think of a word to describe this project and 2 came to mind, prototype and bespoke, neither word is fully appropriate but it’s been a process of building and modifying something which suits my personal driving style and interests. Slightly unique, a bit sleeperish, genuinely sporty to drive and a little old-school. It’s an ever evolving process but most of those aspects of her modification have been there since the outset. As such, we’ve tried a few things which didn’t work, we’ve fabricated a bunch of stuff to suit various mods and in the never ending quest for performance gains have added bits from other vehicles which were not originally intended for Ovlov This all adds somewhat to the complexity of this years maintenance program.

So, having said all that, what are we up for on this occasion:

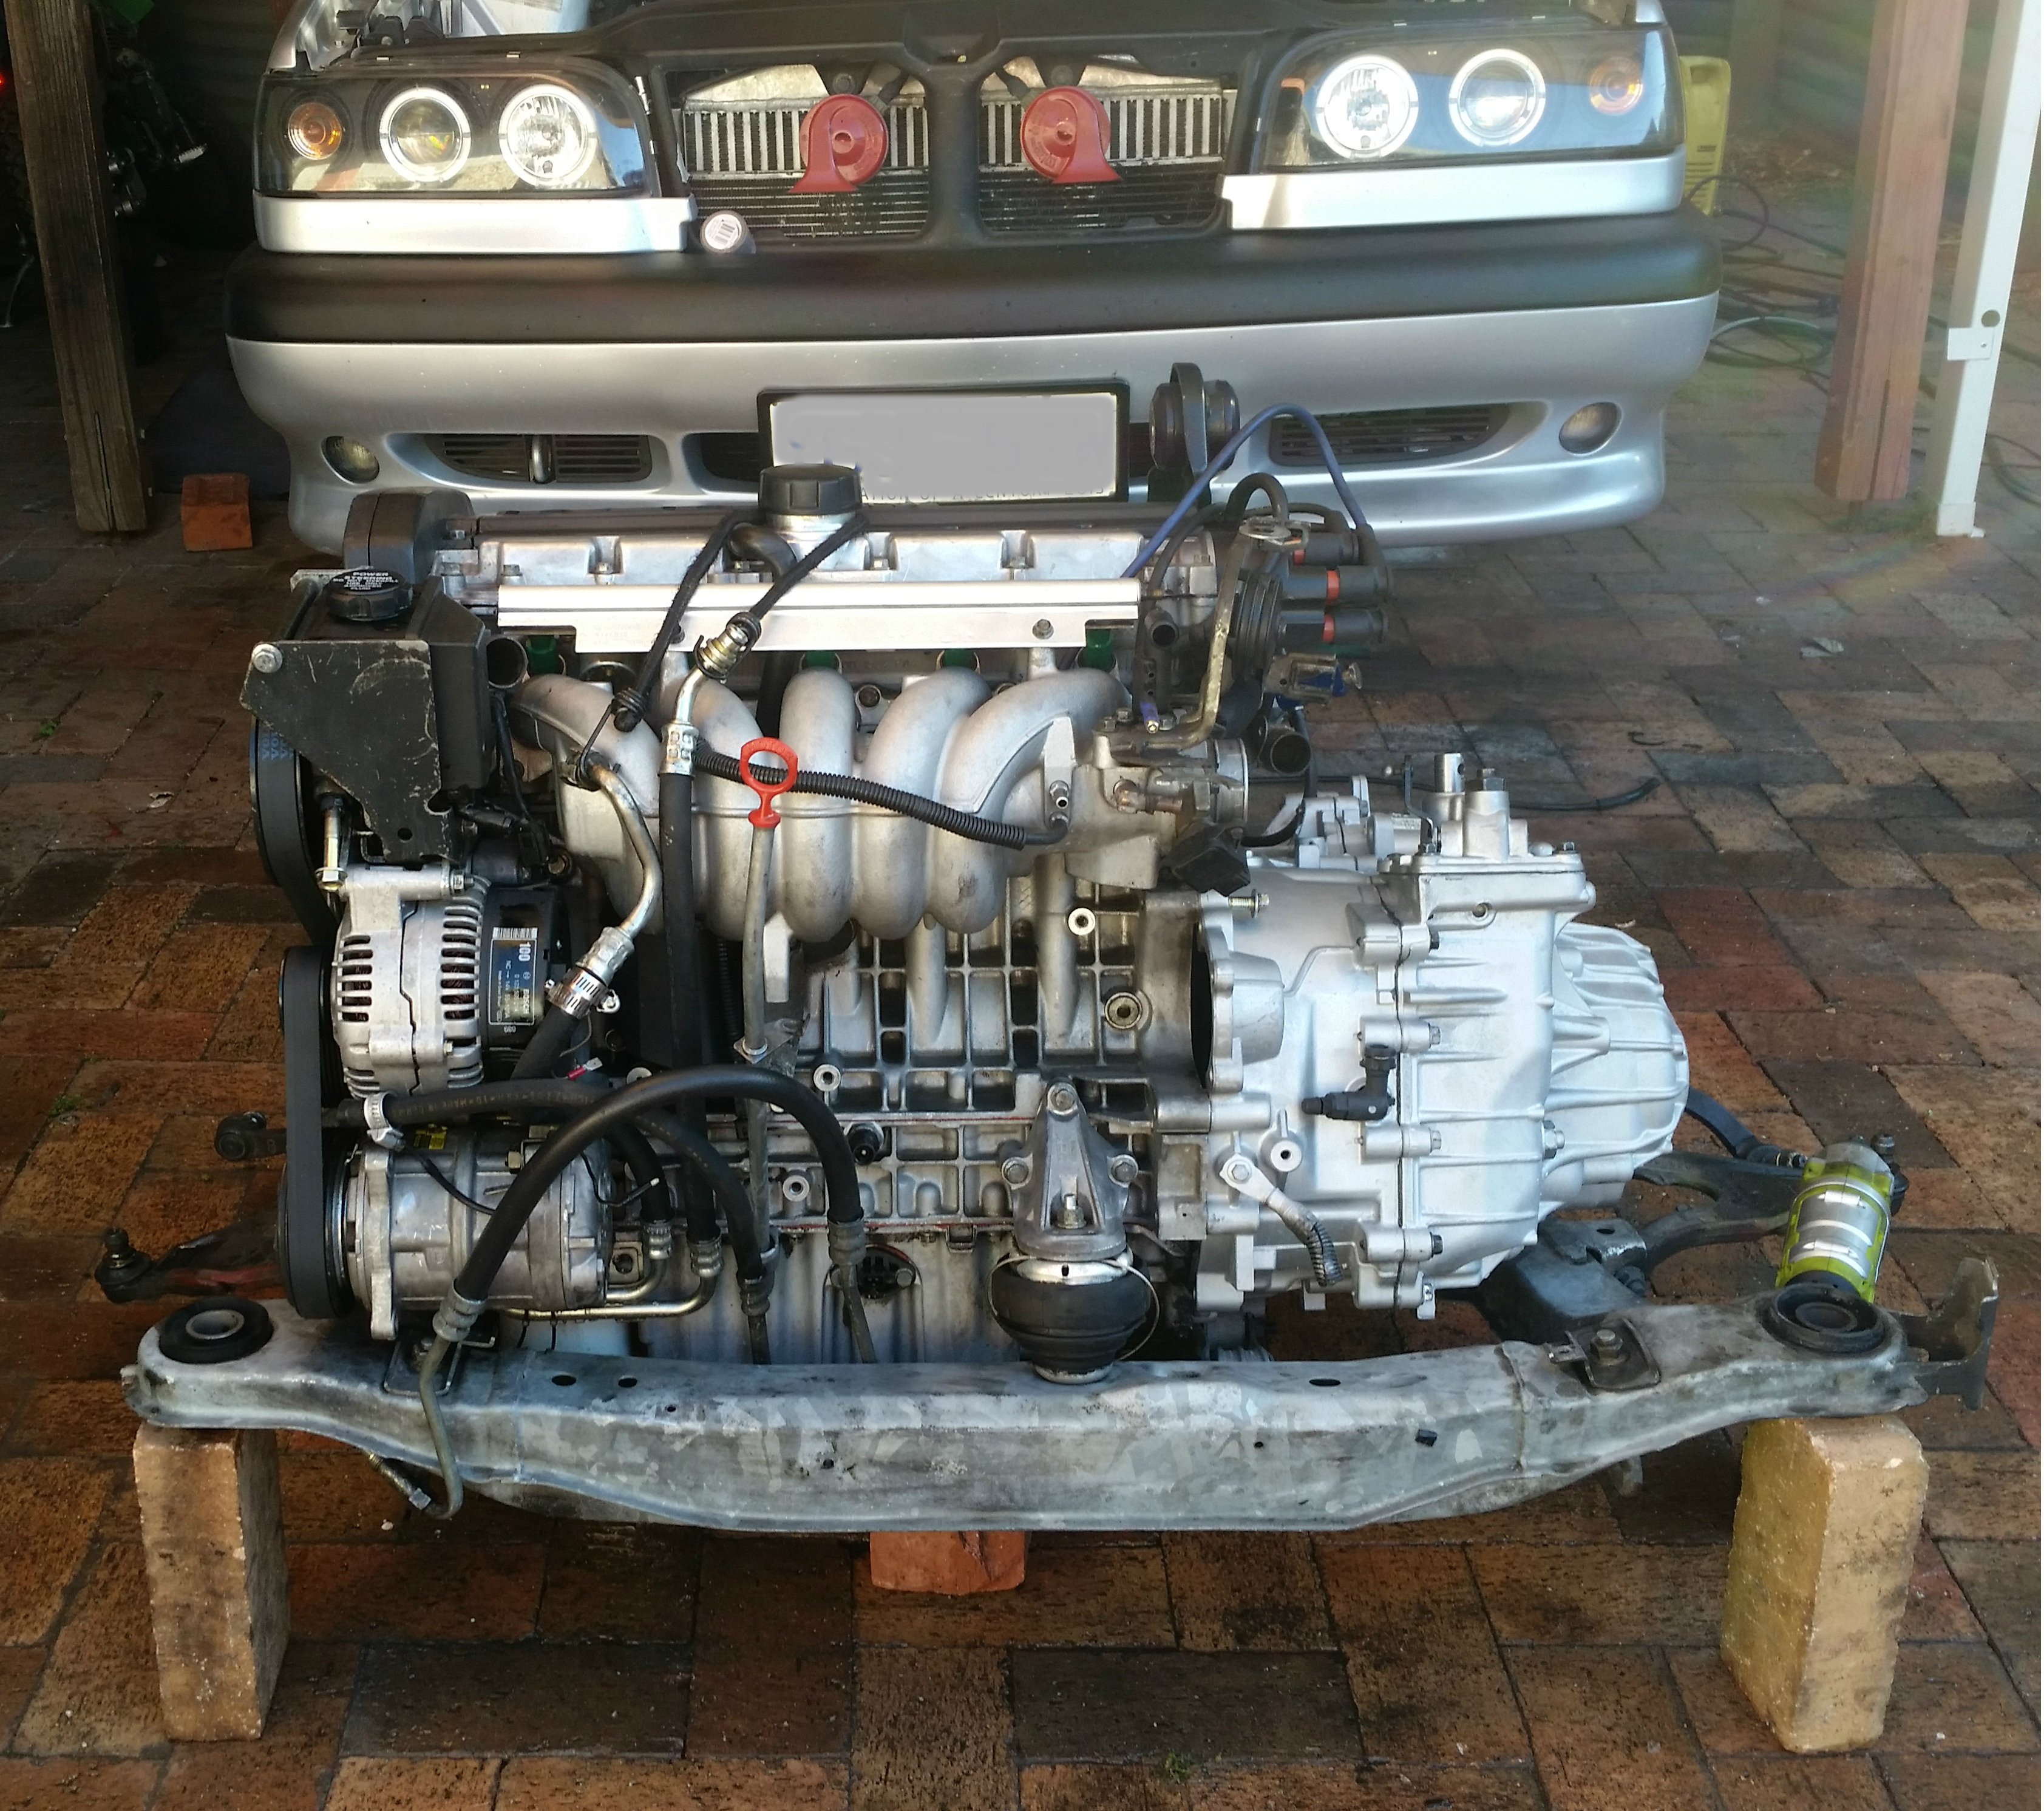
Engine Removal – Given a bunch of years of experience doing this it’s definitely worth mentioning how simple it seems to me now, to drop the engine out of this vehicle whilst attached to the sub frame. You can actually achieve this in half a day of solid work. The process I use is to lower the engine onto a flat trolley then lift the front of the vehicle up using an engine hoist and simply wheel the engine out into your work area. May as well take advantage of the modular design Volvo invested so significantly into with the 850 series models. On this occasion I will still need to lift the engine off the sub frame to remove the gearbox but again, from here it’s a 10 minute job. It really makes the whole engine maintenance process a lot simpler, especially ease of access to gearbox and clutch.

The new second-hand m66 gearbox

Gearbox – Yep, the original M66 fitted in 2017 has been getting a little noisier and although I can shove some additives in her, hot days invariably yield a kind of rattly growl when under load.  Changing oil viscosity also effects the ease at which you can flick through the gears, particularly when cold. I can recommend the value of adding something like an 80w140 oil but even this fails to quieten her on a hot day now. Obviously something is failing and I’ve no idea what exactly. I feel sure I could have persevered with the old M66 for a while longer but when I spotted a local wrecker discounting M66 boxes from a couple of Ford Focus XR5’s (I think they call the Focus ST outside of Oz and NZ) I decided to snap one up. The M66 cost $250 for a 2010 model which is a pretty good deal and this is in part the reason for switching out the OEM M56 box back in 2017, spare parts availability. Thus far I’ve separated the box and installed the MFactory LSD. The box internals look great, though we won’t know fully til the rubber hits the road.

Sachs Left/M-Pact Right

Clutch Friction Plate – When we installed the M66 back in 2017, I chose the recommended Sachs SD 693 friction disk, which if I recall is originally designed to suit a Ford Probe. The clutch has worked very well especially given that we’re pushing a few Kw’s through it. My chief contention with this plate is the spring rattle which occurs at idle. If you want to see for yourself check out the vid here. Could be suitable for use as a tambourine in the local school band. Sounds ridiculous but yes, you can hear it and although it’s not horrifyingly loud, it’s notable and a little annoying. Given that I’m pulling the M66 out I may as well try an alternative option and therefore have chosen the M-Pact HD Multi-Friction Hi-Torque Assembly Disk (Sach disk Left in images and M-Pact Right in images – Available through Rock Auto) I like the theory behind this design, the design is a mix between high performance clutch plate and standard unit. God knows how much I hated the Spec Stage 3 high performance clutch plate that I tried in this vehicle a few years back. Endless shuddering on clutch release reduced drive-ability to crap status, especially in heavy traffic. I’m figuring we won’t see a repeat of this situation with the M-Pact design.

Drive shaft – It’s definitely worth mentioning that you don’t need to throw out your driveshafts when the rubber boots split. I purchased this driveshaft from Volvo about 7 years ago for around $450 dollars and as such it’s a quality unit. Yeah I know, $450 is ridiculous but it was moments like this which drove me to get more involved in Ovlov’s maintenance and reduce those ridiculous Volvo factory expenses. Driveshafts can suffer damage which causes them to be out of balance but generally speaking if you maintain them this shouldn’t occur. I repaired this shaft with a universal Ebay boot kit which cost me something like $30. Of course you can buy aftermarket shafts online but you can’t always be too sure of the quality. In the past I have snapped a driveshaft, subpar quality from Ebay!

As well as the above, a couple of issues which were noted when she was being driven were a knock in the front suspension over certain types of bumps and undulations and a whine from the cam belt area which tended to get louder on a hot day. Therefore we’ll replace strut mount tops, water pump, cam belt and associated bearings and pulleys.

In the interest of maintaining her outward facade we’ll repaint the bonnet and front bumper/air dam. And in like fashion, to maintain her inner appearance I’ve replaced the lining on the roof, which had been sagging for several years.

I also intend to replace the cam timing sensor and Lambda sensor. This car has only ever left me stranded on one occasion and this was due to a failed cam sensor. I’ve got into the habit of replacing this every few years. Probably not warranted and I guess I could always keep a spare in the glovebox. As for the lambda sensor, they seem to throw fault codes every couple of years and this may be the result of the modifications and associated performance gains, who knows. Either way, I don’t want to take any risks with regard to Air Fuel sensing.

At the conclusion of all this, a well earned polish!

I think that’s about it for now and I’ll add some other pics to this post as we progress. Happy modding!

Today’s job 17th April –  Repaint the front air dam – I decided to strip this back using paint stripper on this occasion. This makes the whole process quite quick but you need to be aware that paint stripper will soften the plastic itself if you leave it on for too long. This is nothing serious but will require some sanding before you put on your Plastic Primer Filler.

18th April  – Finished refitting the roof liner.  Not quite perfect but a heck of an improvement on the old.

19th April – Tried to make some headway with the bonnet/Hood respray. Decided to try and do the job right this time around by starting the job off in bare metal. Stripping back the original Volvo paint was quite a task and required around 2 litres of paint stripper as well as some scraping and sanding. Thus far we’ve applied the undercoat, base coat and 2k clear coat. We are yet to cut and polish the clear coat and although not perfect, am fairly happy with the finished product thus far.

20th April – Only a couple of jobs completed today.

24th April 2019 – I’ve been continuing the makeover theme for the last couple of days. I thought I’d have a go at improving the horribly discoloured and scratched bumper. I’m not a fan of painting bumpers as the paint invariably chips or flakes off so in that light I thought I’d have a go with one of the new rubber style plasti dip paints. Foliatec paints are a German product with a decent reputation so while I’m dipping my feet in the water so to speak, I’ll have a go on the rims as well. This stuff is super easy to apply and I’m just hoping that the paint proves reasonably durable.

26 April ’19 – Today I’ve pretty much completed cutting back the clear coat and polishing the bonnet. Overall I’m happy with the completed work though it is far from perfect. Ended up with some very light tiger stripes, but only visible in certain light. If I showed you the bonnet I’ve been using for the last 3 years you’d understand why I’ll be perfectly happy with this attempt. Have to add, that there are some great 3M cutting and polishing disks these days!

16th June – Ok so things have moved on slowly but we’re getting close now. The car is 95% reassembled and we’re ready to finish assembling the front spoiler and bumper.

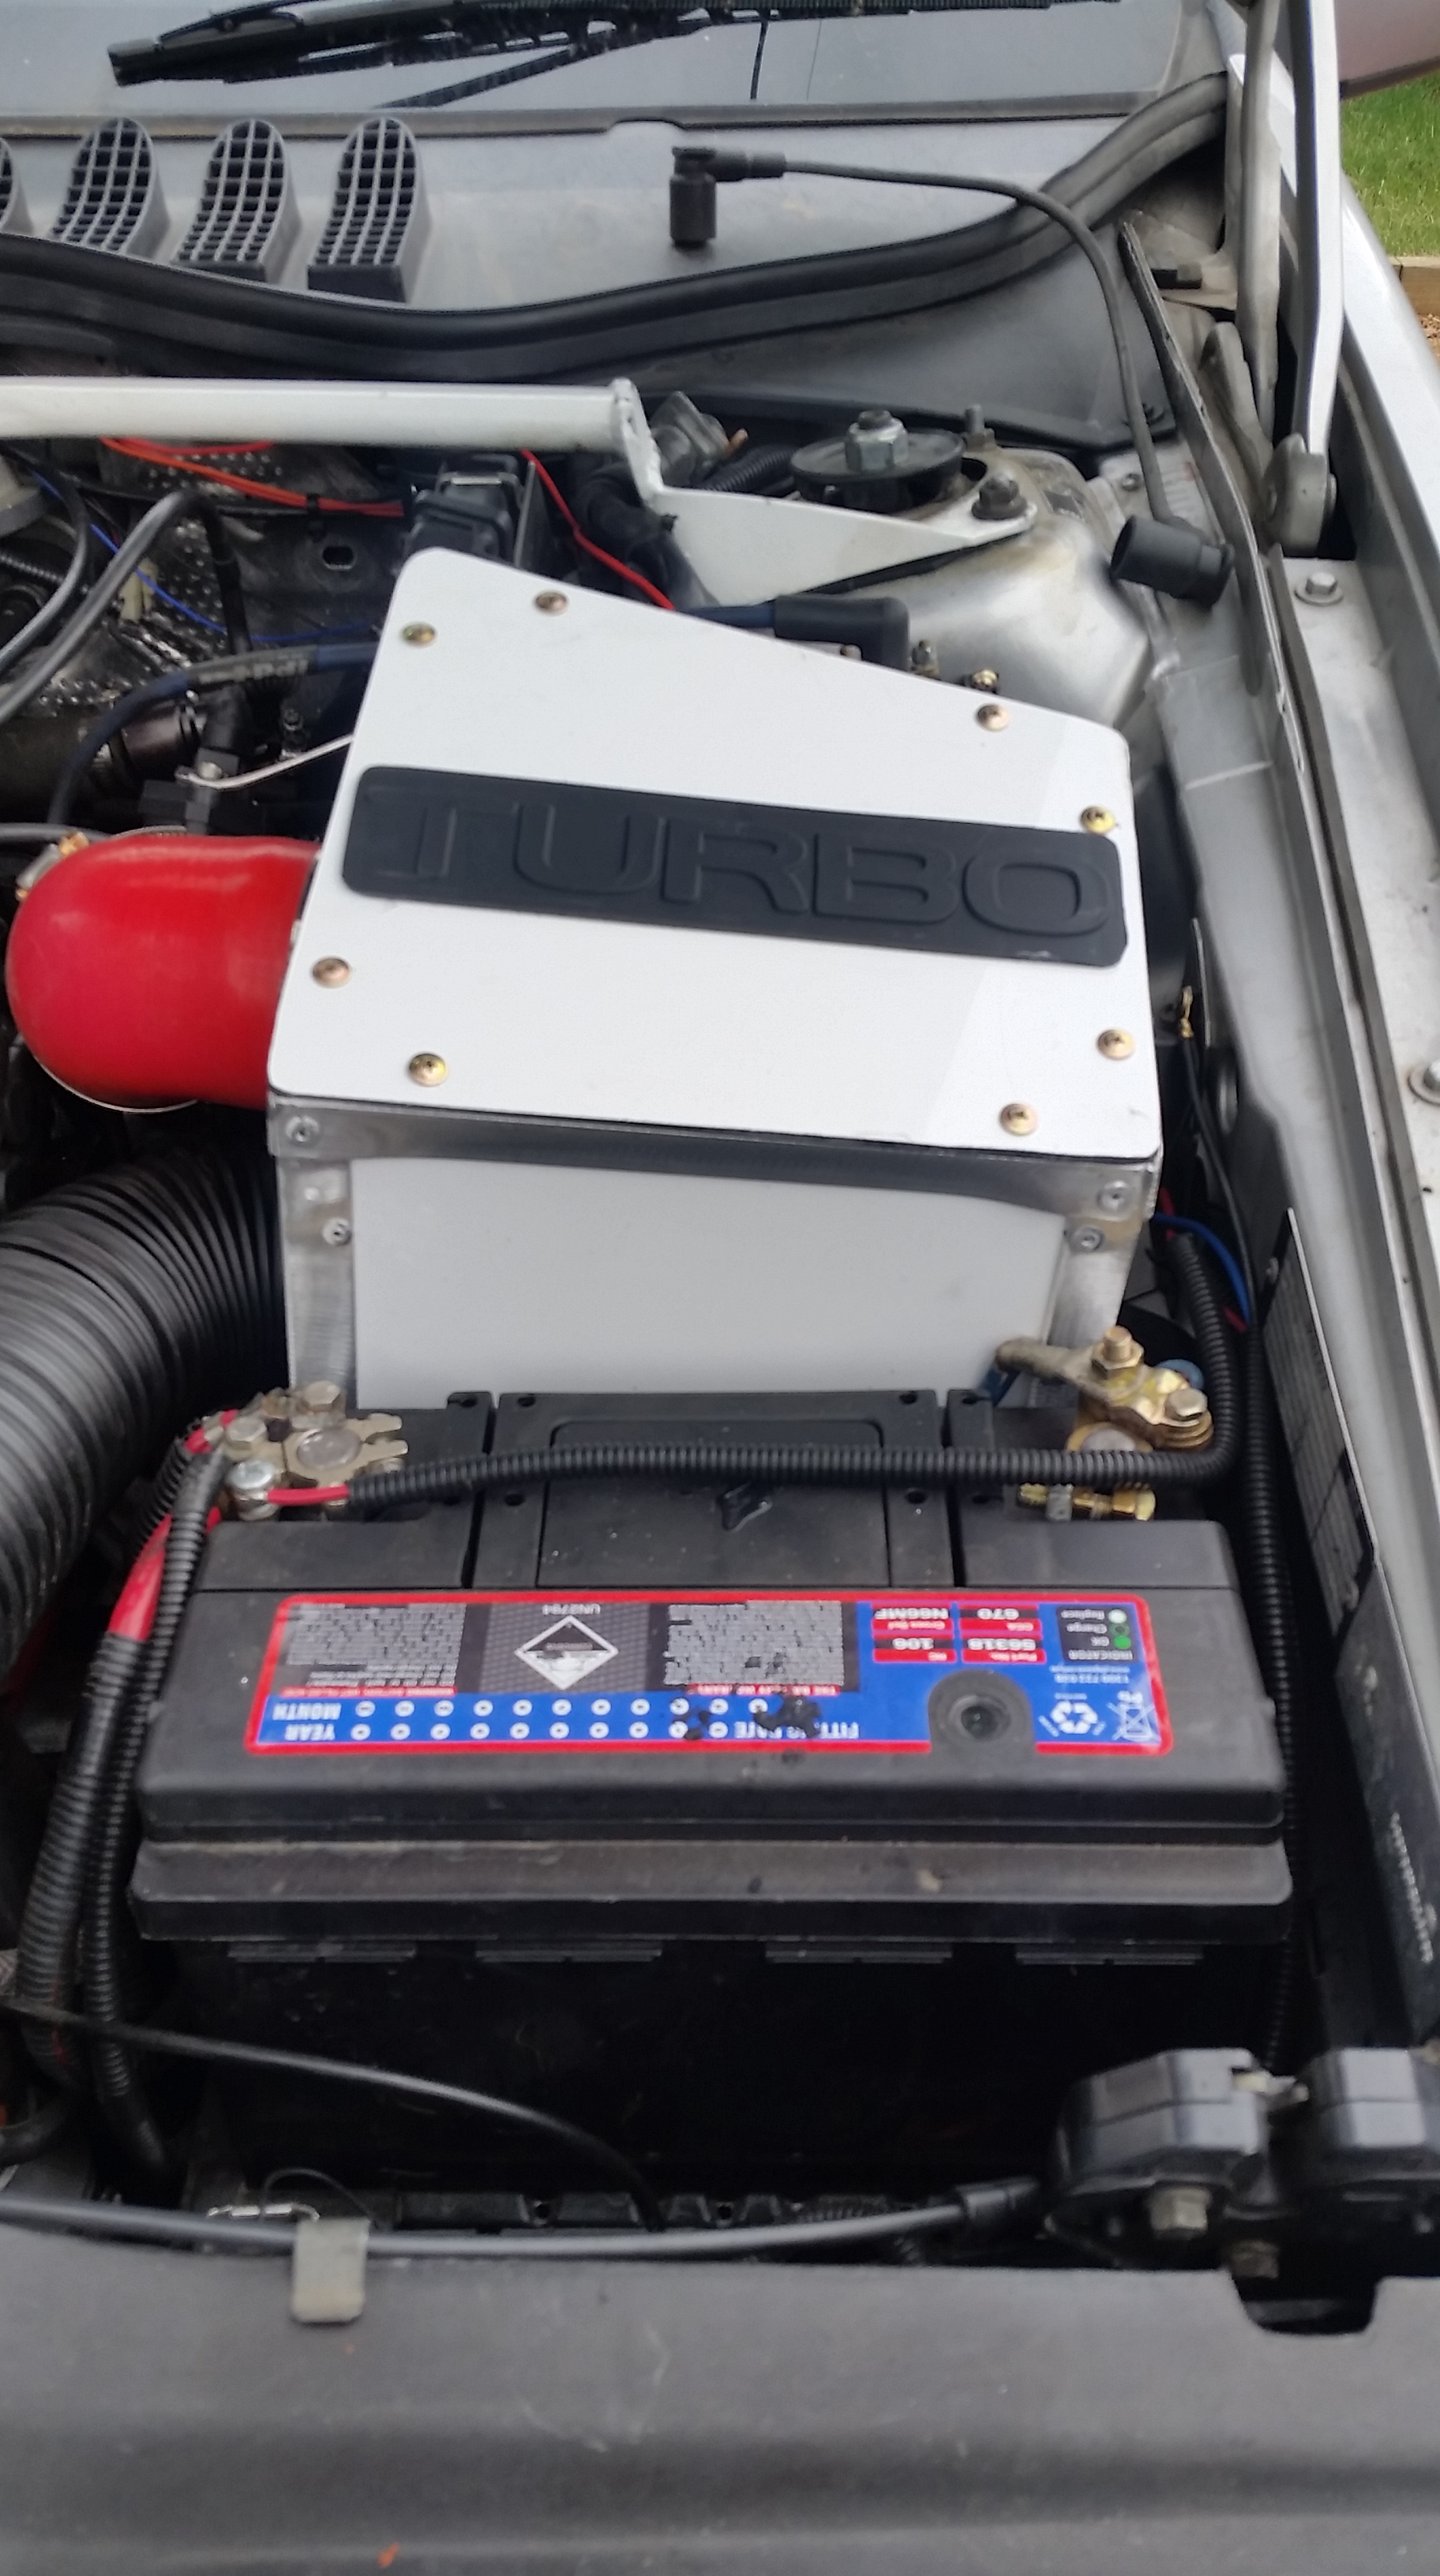
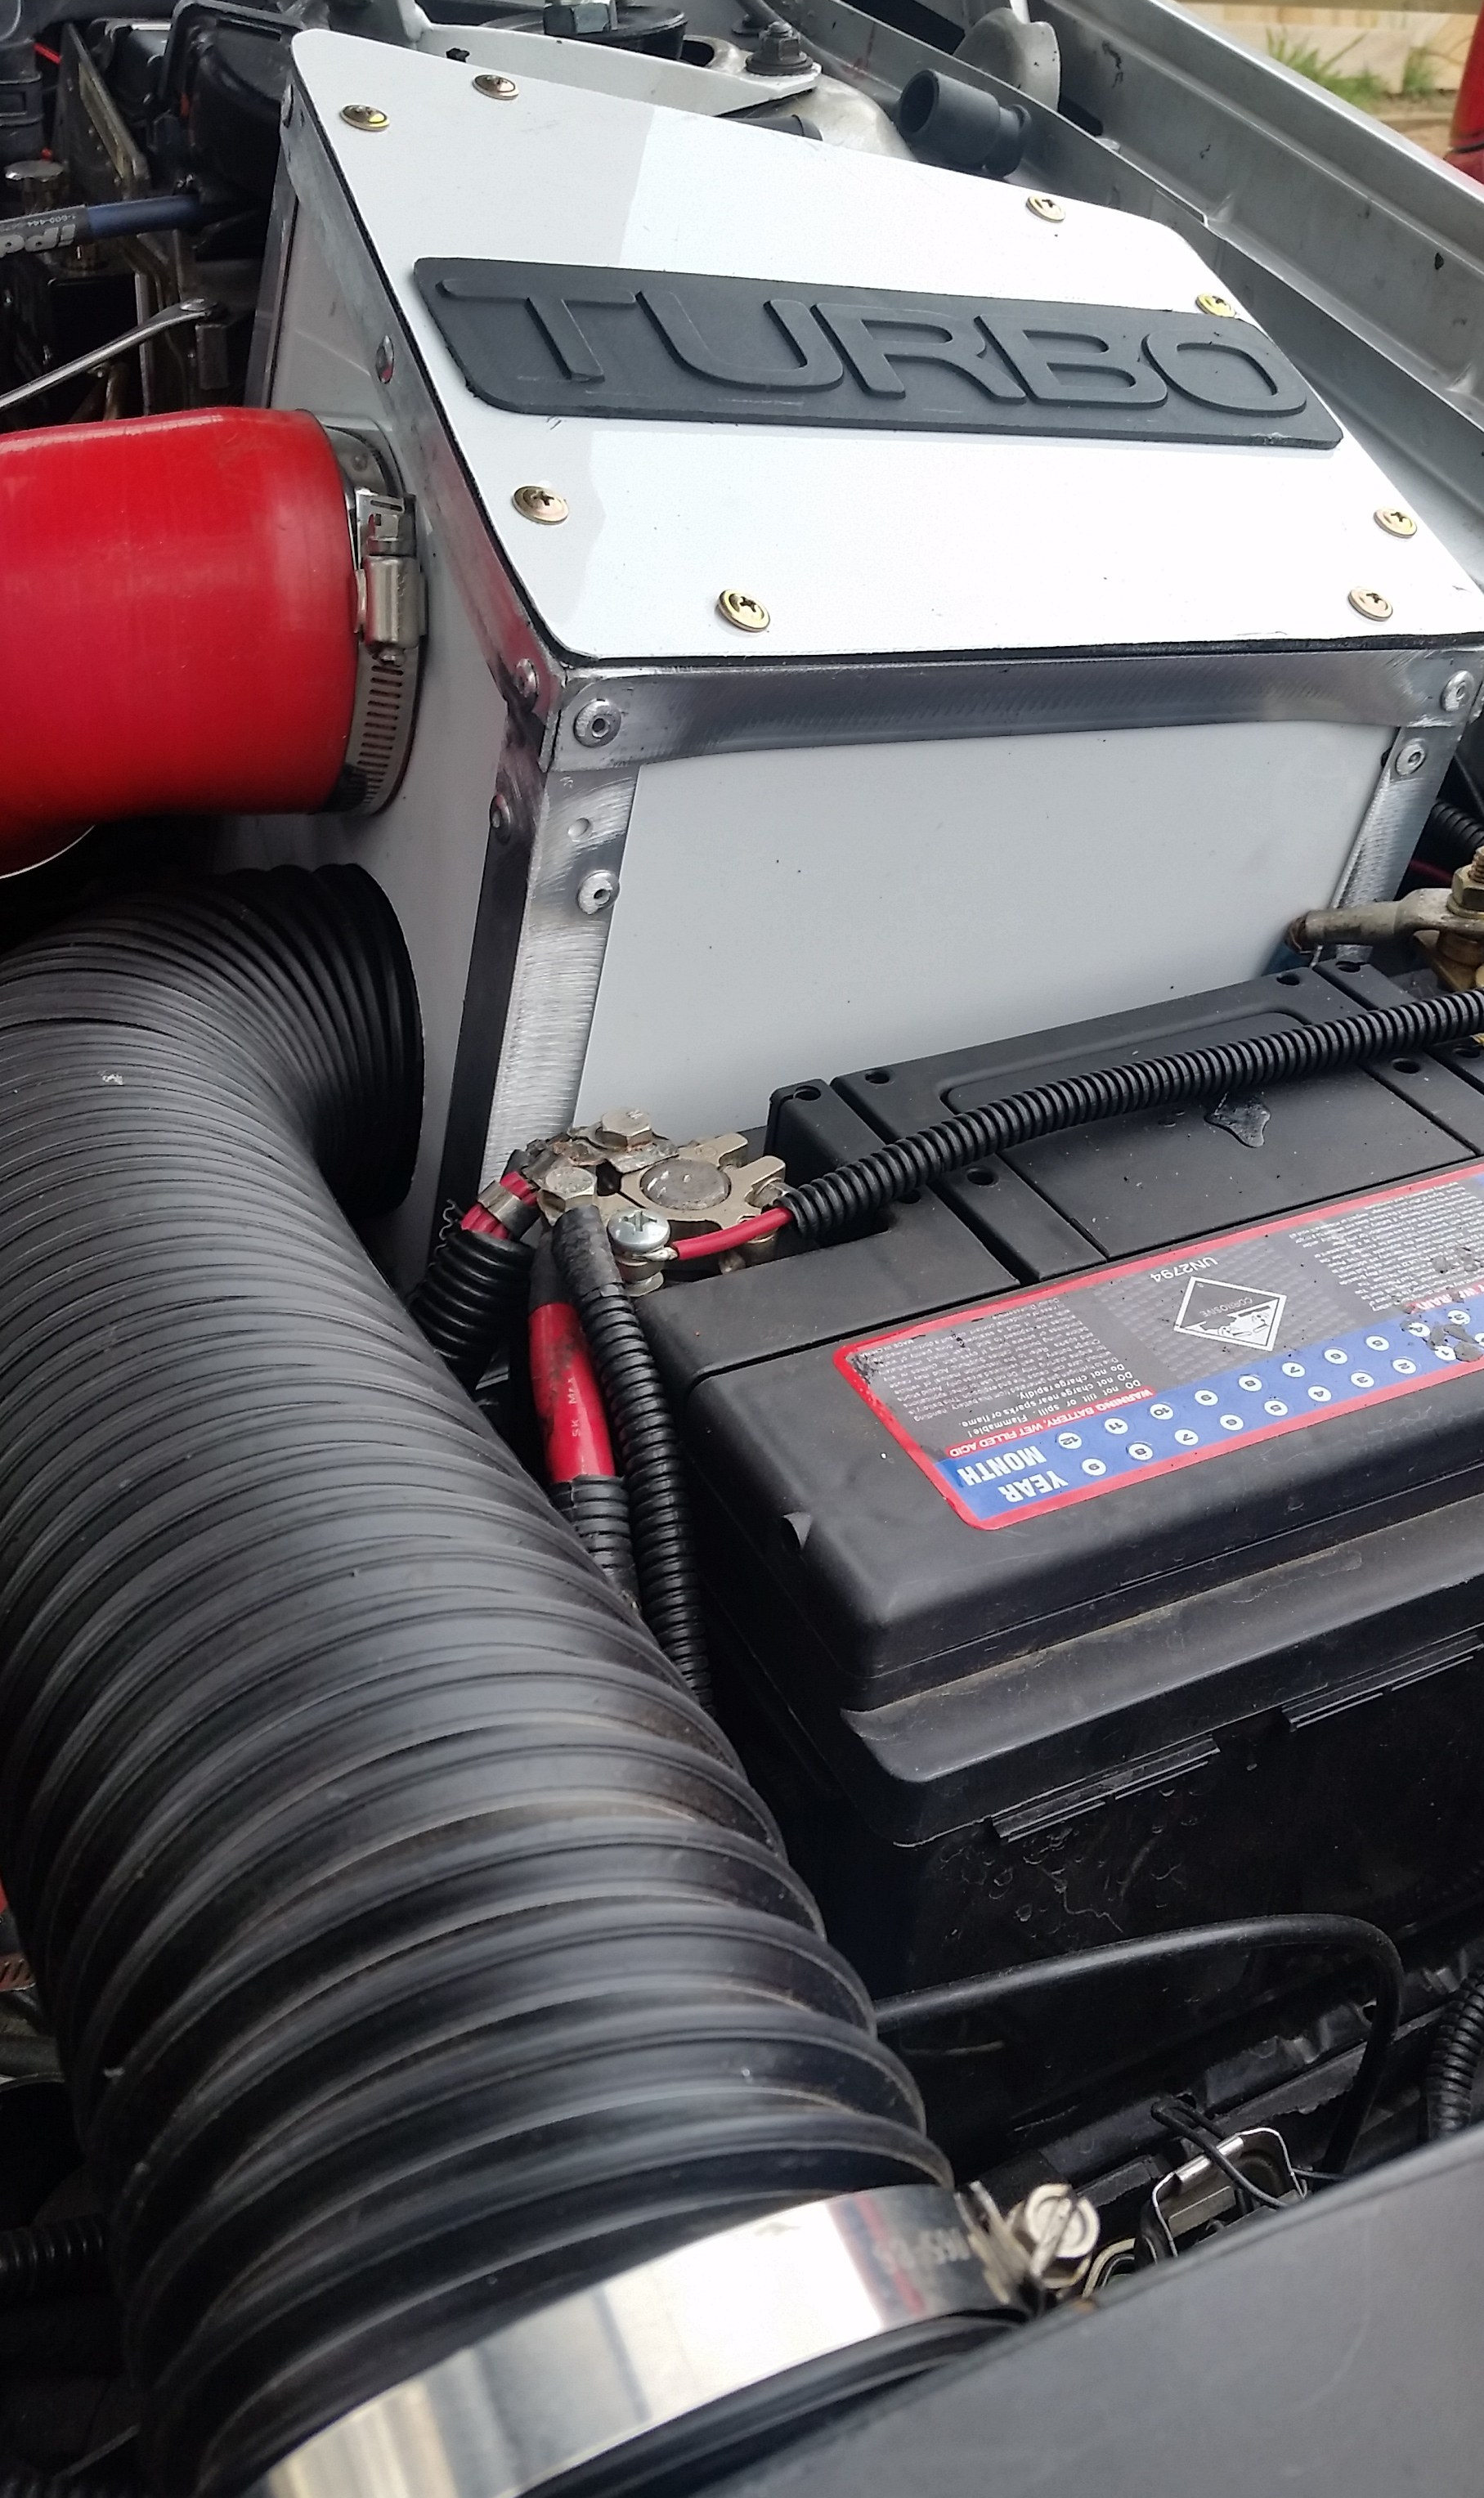
I’ve spent a greater amount of time on this occasion to tidy up the engine bay. She’s still a bit cluttered but at least you won’t find too many electrical wires running here there and everywhere.

The Return of Kinugawa

Hard to believe I’m still finding things to play around with on this car! It’s been a quite a journey and according to WordPress my first Ovlov94 post was May 2013. The past five and a half years has flown by. If you’d asked me then if I’d still be playing around with this car today, I’m not sure how I’d have responded.

But I guess it’s been the “playing around” with and investing oneself into this car which is partly the reason for this longevity. I feel as though it will be incredibly hard to part with her now! It’s not a thought I can sustain for more than a moment as I consider doing likewise with a C30 or something a little more modern. Who knows where this may all end, and so for now the journey continues.

My previous post on this blog revolved around the Mamba turbo issues, specifically my disappointment with a bearing failure. Not that I blame Mamba per se, clearly they’re copying another manufacturers design, which in my humble opinion requires a little more development to prove reliable under extreme operating conditions. It was the last track day I attended that brought things to an end.

In light of my conclusion and the fact that I still intend to use Ovlov for occasional track day outings, I decided to revert to a journal bearing turbo, namely a Kinugawa TD06 SL2 20g. I’ve used 2 of the Kinugawa’s in the past, a 19t and a 20t. Both of these turbo’s performed beautifully and at no time did I have any reliability issues with either turbo.

The 20g is probably not an ideal turbo for track day outings with boost onset coming in a little later than the Mamba. If Ovlov was reserved only for track day use, then I think I’d have stuck with the Owen Hybrid TD04; great turbo for maximizing power and torque with lower rpm onset and extended power curve. But given this car is also used as a daily drive for several months of the year, I can’t help but want to experience those brief but stimulating moments of acceleration with a sh#t load of boost!

The specific variation of 20g turbo I chose, for those interested, was a unit which would ordinarily be at home on a Nissan RB25det or similar. Given there are so many variations and options on a turbo purchase these days, I’ve listed the specific unit info at the bottom of this post.

As with any significant turbo swap comes the inevitable bunch of changes to make it all work. I had to fabricate myself a 6 bolt exhaust flange adapter to suit the Nissan style turbo. Learning to TIG weld has been a game changer! The rear engine mount also required modification due to a slightly larger compressor side on the new Kinugawa. This would not normally be an issue except that I had to fabricate a new rear engine mount when I installed the M66 gearbox sometime ago.

A couple of other changes I threw at her whilst at it included the fitting of a Turbo beanie, something I’d not really looked into until recently, but they seem to make sense. Theory says that isolating heat to the turbine housing whilst reducing under hood engine temps is an efficiency gain. I also took the opportunity to fabricate a new intake airbox that completely encloses the existing POD filter whilst allowing fresh air only into the unit. Again, cooler air intake temps improve performance. This was a fun project and you can see the before and after pics below. Fairly happy with how it turned out. Realistically it’s just a variation on the oem unit but provides the opportunity for higher volumes of air flow.

Before photo – 4″ x 8″ Pod to replace OEM intake

20181231_154215

After photo of Airbox – Pod filter enclosed

20181231_154325

When I installed the POD filter to maximize airflow some time back I was always going to be pondering the benefits of doing so. Under hood summer temps in this car are significant, not such a  problem in a Canberra Winter, but right now in mid summer and 36 degree C days, it’s notable.

Having completed the above changes what can I say about the driving experience. The boost onset of the 20G is a little different to the Mamba GTX30171R. It reminds me of the 19t experience. Boost comes on with a blast, it just happens a little higher in the rev range. I don’t feel as though the driving experience has suffered and boost is adequate in the mid range, it’s just that things seems to come on with a greater flurry around 4500rpm, a little later than the ball bearing turbo.

If I had to take a guess, the butt dyno says very similar power output but I reckon if you looked at a dyno curve the Mamba would look less aggressive and more linear.

One thing I did note during a couple of WOT runs was the mixture is running a little lean. I’m not convinced of any issues with the set up as such so have ordered a new tune to suit the build from the Volvo dude in Portugal, Rui. Until then I’ve not been too willing to push her real hard, especially in this summer heatwave.

Well that’s about it for 2018. Let’s see what the new year has in store for Ovlov!

KANDO P/N– 331-02035-156 – ACCESSORIES-001

ITEM NAME– Kinugawa Bolt-On GTX Billet Turbo 3″ Anti Surge, TD06SL2-20G with 8cm Turbine Housing and 9 Blades, Turbine Wheel For NISSAN RB20DET RB25DET

APPLICATION  – Nissan Skyline R32 R33 R34 2.0L 2.5L RB20DET RB25DET Engine,  – Universal application: 2000~3500cc

CHRA/WHEEL SPEC – TD6SL2-20G, – Compressor wheel : 52.3 / 68.0 mm,   (GTX Billet 20G 11+0 baldes / Max boost to 5.0bar), – Turbine wheel : 54.1 / 61.0 mm,   (High flow TD06SL2 / light weight 9 blades)

COMPRESSOR HOUSING   3″ anti surge inlet, – 2″ compressor outlet, – A/R.60

TURBINE HOUSING – 8cm / AR.57, – T3 inlet flange,  6 bolt outlet – wastegate dia : 28.0 mm

COOLING/BEARING SYSTEM – Oil and water cooling – Journal bearing kit, (Performance thrust bearing kit)

ACTUATOR PRESSURE – 1.0bar / 14.7psi

BOOST/HP – boost limited : 2.8bar suggest boost : 1.5bar – max hp : 300~400hp


Mamba Turbo update

Apologies for the delay in responding to those who left messages requesting an update on the performance of the Mamba GTX3071R turbo. I’ve been focused on other projects and until recently hadn’t had any issues at all with the turbo. But, following our last track day event it became obvious something wasn’t quite right. That something was a whine emanating from under the bonnet…..at first it sounded like an alternator bearing failure, but sadly some further investigation led me to the turbo.

Not sure how many kilometers we’ve traveled with the Mamba but it’s been around 18 months and 4 track days. It was the last day track day which brought it undone. Having eliminated all of my previous boost leak issues with this turbo I was able to push hard during the four 15 minute sessions we took part in.

Over the born again life of rebuilt Ovlov this is the first turbo failure we’ve had, having run the Kinugawa, Owens and now Mamba turbos.

Having researched the issue I can’t say the Mamba turbo is a poor quality build by any means. I believe that the turbo design is carbon copy of the Garret GTX3071R, the internals are close to identical and from what I can gather the Garret versions also suffer with bearing failures. The replacement bearing kits are readily available, along with a few DIY replacement videos from committed YouTubers. Clearly there is a demand out there and the issue is a design and installation related matter.

I can’t say for sure if the Mamba turbo would have failed had I limited her to street use only. In my particular instance it may have been the significant heat generated on the hotside of the bearing cage which has caused the issue. Whether I may have contributed to this issue by not running the engine on for long enough following each track session, I don’t know. There is a belief that the significant heat generated on the hotside bearing needs a reasonable engine run-on time to allow the heat to dissipate more evenly. Whatever the case, disappointingly it failed.

I guess that leads to the question as to why choose a ball bearing turbo when a journal bearing turbo may actually prove more reliable. The answer is a no brainer really! In motor vehicle applications the ability to spool up quickly provides significant performance gains. The general consensus is the ball bearing Garrett turbo can spool up around 15% faster than journal bearing turbos. It is a recognized fact however that ball bearing turbos are a less reliable option when running for prolonged periods at high boost. This fact is substantiated by the aeronautical industry who continue to prefer journal bearing turbo applications on the basis of reliability.

So, where we are at right now is that I’ve completely disassembled the turbo. This is not a difficult task by any means and the more important aspect will be to reassemble the turbo and retain the original position of the shaft to compressor and impeller wheel position, so as to not upset the original balance.

As stated, what I found was the bearing no longer spins freely, smoothly or as quietly as it should. I’m sure that we could have got a bunch more K’s out of the turbo but it’s not worth the risk or the annoying whine, not to mention that spool up time and performance would have been effected. Here is a pic of the offending beast. It’s a little annoying that this unit will set you back around $300 bucks AU. That does make this whole process a little frustrating and I can’t honestly see how this cost is justified…but there you go!

In summary, I can’t say I’m not a little disappointed and it does leave me wondering if this turbo is suitable for Ovlov in the longer term, particularly given that I fully intend to continue with track day events. I should add; I don’t personally believe that a genuine Garrett equivalent would have fared any better.

At this point in time I’ll replace the bearing assembly and play it by ear. It would be a very easy option in the future to swap into something like a Kinugawa TD06SL2-20G, with very similar specs to the 3071, and we’d be reverting to a journal bearing turbo.

Having said all of that, I’d have no hesitation continuing to recommend the Mamba turbo as a suitable option for street use.

In the end I decided to go back to a Kinugawa journal bearing turbo. You can read more about that here. 

Volvo Therapy

It’s been a while I know! I feel like I’ve been enjoying the fruits of my labour somewhat uninterrupted by further significant modifications. Having said that, I’ve missed crawling around under her hood/bonnet. (depends where you live)

I work in the community sector with people who are homeless and suffer mental illness and addictions etc. Often referred to as having complex needs. The frustration of working in this field is that you can’t fix people. Sure you can help make things a little better for them. Don’t get me wrong, we do have wins.

In that light I’ve discovered over the years the therapeutic value of working on cars. Perhaps not true for all people but at least I can fix them, make them work better. The sense of personal achievement and value to my own well being is something I’ve appreciated. Enjoying the fruits of my labour yes, but also rewarding and providing some down time from the ills of life.

I think this is in part why I cling to this old girl, aside from the fact that she’s quite impressive for ’94 vehicle, I need her in order to function effectively 🙂

I will admit however some frustration in the modification process is not at all uncommon. I don’t always get it right and the dumb-ass things I’ve done at times confound me. Given some hindsight this usually occurs when I’m pushing to get the job finished and frustration is creeping in. An obvious mistake, or what should have been obvious to me at the time is overlooked.

I discovered one example of this just recently. Having undertaken some fairly substantial work to rectify an ongoing boost leak between the turbo and manifold, (more shortly) I’d proceeded to drive the car for some weeks realizing that something wasn’t quite right.

In my mind I gather information whilst driving trying to piece things together like a puzzle. It went something like this. Boost is good, in fact very good, so good in fact it feels as though I’m having some spark blowout again…..Hmmm maybe! I’ll think about it. Then, Hmm, seem to be losing some boost momentum between gear changes, feels a bit laggy. Then Hmm, gosh the recirculating blow off valve sounds like it’s letting off a lot of pressure, noisier too.

I’m only giving her occasional wot so I don’t really pick up on the issue too much. Then last week I decide to give her a good run on some open road and next thing I hear is what sounds like an increased whine from the turbine at low revs. I’m thinking uh, oh, what now!

So here’s the dumb-ass thing! The manual boost controller is not connected to the waste-gate! Duh! The waste-gate is not actuating so yes, I have been getting significant boost. With no waste-gate the recirculating blow off valve is dumping all of the pressure (of course it’s going to sound noisier) and the result is a loss of power/boost at gear change. The whine in the turbo was a result of the boost pressure blowing back through the turbo when I gave her a decent run, and the intake pipe had popped off at the silicone hose connecting to the turbo.

I could kick myself cause such a small mistake can damage the turbo. This can occur when the reverse air pressure at high boost attempts to blow back through the turbo due to what is effectively a disconnected waste gate. Idiot!

Puzzle solved, no damage done from what I can tell. I feel some sense of accomplishment at having rectified my stupid mistake. Looks like all ok…… Spins fine and boosting perfectly well too.

I love the way ceramic ball bearing turbos spin so easily. Nicer than the OE TD04 journal/friction bearing.

Other than my balls-ups what I can tell you is that the Mamba turbo is running great. That statement does come with one other admission; now that I’ve removed the turbo adapter plate. In earlier posts I alluded to issues with boost leak at the manifold adapter plate. I’m not sure I ever really got my head around what was happening and no matter how often I re tightened the turbo to the manifold, it would invariably end up with a boost leak. At 24psi and 6000 rpm what happens is that the fuel mixture leans out, causes detonation and the potential for a catastrophic outcome.

The offending part

On most occasions this failure occurred on track days. As I said, I’m not sure I know exactly what was going on but am willing to guess possible hot spots, evidenced by slight bowing in the adapter plate.

The fix is not really that hard but you have to permanently modify your exhaust manifold by either machining off the flange or in my case some very patient flat filing then discarding the adapter plate. This of course meant that the turbo was now a half inch closer to the engine block which required some changes to the home fabricated engine mount and fiddling with the turbo drain pipe. Changes which were far more easily managed when the engine was outside the chassis.

Never the less, I’m not saying that the adapter plate was at fault, but in my case, it was! 🙂 I’d highly recommend modifying the manifold as pictured below.

The other change I made was to retap the 2 manifold threads and install 4 more substantial high tensile studs/bolts and nuts. So far so good!

What else I can tell you is that the clutch slips under WOT acceleration. I suspect that this has been exacerbated by the installation of the LSD. In the past it was quite easy to lose traction and spin up one wheel. Those days are long gone and no doubt the clutch plate is carrying that additional torque load. To be fair on my poor old clutch, it’s not like it affects daily driving much at all, provided you manage the rate at which boost comes in.

There are quite a few friction plate options out there that I can utilize with the M66, one being a performance plate designed for the ’91 Ford Probe Turbo. The other thing I don’t like about the Sachs SD 693 friction disk is that it rattles, or the torsional coil springs rattle that is, at idle. Something which I find a little annoying.

Other than this I’m yet to complete the 3″ exhaust, also need to repair or replace the clutch master cylinder which seems to be dying slowly.

I guess this will make for some therapeutic mental health time during the Christmas break!

Happy modding!

Annual Maintenance Time

It’s about this time of year I invest some time and energy in addressing longstanding maintenance issues, a little like Christmas for Ovlov actually!

In the lead up to this event I tend to accumulate a list of issues in my mind, and a bunch of parts in the garage. This year I’ve accumulated a set of sub frame bushes, actually I’ve been sitting on these for close to two years. A front bonnet, a pair of front upper strut mount bearings with spring seat bushing and I’m also waiting on an order of rear suspension parts from FCP Euro.

After 22 years I feel it’s about time to replace the rear trailing arm bushes and outer links. I suspect that this job has never been attempted on this vehicle and no doubt the rubber in these units will have perished somewhat. Whilst I’m at it I’ll also throw in a pair of Bilstein struts to replace the Sachs OEM units I installed 50k ago…that’s 50,000 klms.

The rear suspension does groan and rattle occasionally so hopefully this will keep her rear end in good stead for a few years more. We’ll need a couple of each of the above to do this job.

Then of course I’ve got the M66 ready to install which is a reasonably straight forward swap for the M56. I’ve a buddy who will fabricate a couple of bits for me in the next couple of weeks which should see this come a little closer to fruition. The challenging aspect for a couple of people with no design or engineering skills will relate to fabrication of a suitable rear engine mount. To assist with this process I have engine sitting in the subframe with the M66 gearbox in place. This will make the whole process a little easier.

engine-subframe

I’ve also been able to identify the couple of sections on the gearbox which will have to be cut away just slightly to help with fitment.

While all this is going on I’m seriously thinking about fitting the larger 65mm NA throttle body. I gotta say I’m yet to be convinced concerning the benefits of this change as I’m fairly sure we’ll lose a little low end torque, but in all fairness to the multitude of mods completed on this car, we’ve already lost some bottom end performance. I’m thinking that the M66 gearbox will provide some improvement in low end acceleration and torque due to lower gear ratios so together with the throttle body mod, the bottom end losses may not seem significant. I would however like to believe the larger throttle body will provide some HP gains at higher boost and WOT…..time will tell!

The size difference between the standard throttle body and NA throttle body is significant enough to make a difference. I did note several comments on line from people indicating a loss of low speed drive-ability after fitment but I suspect this would be the result of mistakenly removing the plastic wedge restrictor attached to the throttle plate. In-spite of the belief of some that Volvo engineers were some sort of idiots that fitted plastic bits unnecessarily, this restrictor makes a noticeable difference at low speed on/off accelerator control. I did experiment with this by removing on a turbo throttle body restrictor and noted the difficulty applying small smooth application of throttle when the engine is cold.

throttle-body You can see in this image the plastic wedge which many want to remove. At wide open throttle this plate will make little or no difference to airflow. It is designed to effect airflow at small throttle openings only.


One maintenance issue alluded to earlier which I’ve dragged out for a while relates to the subframe bushes. Prior to tracking this car a little earlier in the year I had a performance suspension mob set up the front and rear toe angle. At the time a small issue with the caster angle on the front left corner was noted.

I oughtn’t have been surprised as she’s always pulled a little to the left, even on a perfectly level surface. Following the suspension tune she still pulled a little to the left with the caster noted as the likely culprit. As such I’ve been quite keen to inspect the quality of the subframe and replace the bushes.

Having removed the frame, cleaned 20 years of crud and grease off it, the bushes looked quite good but the culprit was spotted. At some stage the subframe has been damaged at the lower control arm mounting point. This has pinched and turned the rear mounting point in and at an odd angle which would definitely explain the caster issue.

The strange part about this being that the damage is on the upper side of the frame and the reason I’d not spotted it previously. One can only imagine perhaps when being rebuilt at an earlier time the subframe has been forced up whilst some thing engine or gearbox related was in the way. Alternatively something large dropped onto the subframe, ie engine and gearbox. Either way I was happy to identify this and rectify.

Location of damage

Location of damage


Arrow indicates open gap which was pinched closed and twisted due to damage

Arrow indicates open gap which was pinched closed and twisted due to damage

Having rectified the above and replaced the bushes I’m a little happier that the day was productive. As a footnote, it only took around 3 hours to drop subframe out and remove. For some reason I thought it was going to be a forever job.

One last item which is on my hit list is a replacement front bonnet/hood. When I resprayed the current one a few years back I did a fairly poor job. I’m also revamping the bonnet vent to something which I feel is a better shape which should suit the look of the car better….I hope. I feel a lot more comfortable now with the quality of my prep and spray painting skills so fingers crossed I’ll be happier this time around. There are a few more hours of prep required but hopefully I’ll have this ready when she’s about to get back on the road.

One last item which is worth mentioning and I highly recommend for the enthusiast is an electric rattle gun, otherwise known as a cordless impact wrench. This is my favourite newest tool and I don’t understand why it took me so long to get my hands on one.

342595-thumb


It will probably be a few weeks before I get her all back together and on the road. Until then happy modding!

Out with the M56 5 speed and in with the M66 6 speed with LSD

20161113_150225_resized

The M66 all cleaned up and waiting to install LSD

That’s gotta be the longest title for a post on this blog yet, and in like fashion this particular modification will rate as one of the more significant aspects of Ovlov’s  evolution.

When considering this change I have to admit wavering on the issue for some time. The existing M56H is a great gearbox. It’s completed 260,000klms and 130,000 of those whilst in my care. It remains in excellent working condition and will continue to do so for some time more yet. The M66 won’t give her a better top speed and may not even be as robust as the M56 and so you might wonder why proceed in this direction.

One reason being my concern around availability of another M56 should this unit eventually fail and particularly as she’s been spending more time as a track vehicle. As such when the opportunity arose to pickup an M66 from a V50 t5 for a bargain price, I could hardly refuse. There are increasing numbers of the M66 gearboxes out there and decreasing numbers of M56’s. It makes sense to make the change now and find out exactly what’s involved and have access to further M66 stock if required.

I know that M56 and M59 gearboxes can still be found, but the reality is that they come with the car. i.e you gotta buy an old manual 850 or s/v 70. This is increasingly problematic as it takes considerable resources to find, buy, store and strip parts from these old girls.

The fact that Ford also utilized the M66 box in it’s Ford Focus XR5’s, also known as Focus ST225 outside of Aus, adds to the availability of boxes and associated parts. For example, the Mfactory LSD intended for install in this upgrade is not found anywhere listed for Volvo vehicles, only Ford Focus.

The LSD is an aspect of the upgrade which I’ve been very keen to address and the additional traction will be warmly welcomed. I had learned to manage the limited traction of the open diff in track day events but this has without a doubt, limited the capability of this car. How the newly installed LSD will ultimately effect performance and drive traction will be interesting to experience and I am certainly excited about getting to that point. In terms of road use, it will I hope be a nice change not being caught unaware with sudden changes in direction under hard acceleration. It can be a little scary at times.

And so to kick this all off I’m going to post around this modification in a few stages. This post is also a pre cursor to the actual change and for anyone out there whose already undertaken this swap I’m listening with open ears. I’ve been researching this for some time, at this point the only unknown relates to the fabrication of a new engine mount on the rear passengers side (au). Other than this I believe we are good-to-go.

Given that this is the 2 wheel drive M66 swap, and we are swapping into a vehicle which has an existing manual gearbox, and there is no dual mass clutch plate to be concerned with, and the existing M56H has no inbuilt speed sensor, the process is somewhat simplified.

What is required?

  • A new clutch plate to match the change in the spline on the M66 gearbox. On good advice I’m told that the Sachs SD693 clutch plate can be utilized in conjunction with the existing R series pressure plate.
  • The existing hydraulic clutch line will need to be replaced/modified, as the M66 utilizes a different style of slave cylinder.
  • The gearshift lever assembly will require some fiddling as there are differences in the way existing cable connects to the gearbox, but again, others have been there before me and completed some modification  to existing brackets without too much difficulty.
  • The fitting of the Mfactory limited slip diff will require that the diff bearings be replaced and some new gearbox drive shaft seals installed.
  • The M66 will require an OEM thrust bearing but this is simply because the old is worn out. Not a modification as such.
  • The rear engine mount on the Passenger side (AU) of the engine will require fabrication of a new bracket and mount.

While all of this is going on, long overdue replacement of the sub-frame bushes will take place, a job I’ve been wanting to address for ages 🙂

I thought I’d keep a running tally of items on this part of the project, including links and prices which may prove helpful to anyone wishing to undertake this same modification.

  • M66 Gearbox – 2006 V50 T5 FWD – Sydney Motor Recyclers $80 (yep, it was a bargain buy)
  • MFactory Helical LSD – Suitable for Ford Focus ST225 M66 6 Speed –  Of note, Mfactory only list this unit for the Ford Focus XR5 (AU) or St225 (overseas) but I did confirm it’s compatibility. Purchased from Diff Lab $1000 au
  • Sachs SD693 Clutch plate – Purchase from Rock Auto $70 au
  • Sachs SB60223 Release Bearing and Cylinder Assembly – Purchase from Rock Auto $120 au
  • SKF Differential Bearing x 2 – SKF 32008 xt9/q or National NS32008 – Source from Rock Auto $25 each. (I noted that some M66 gearboxes utilize a larger diff bearing 32010 x. I suspect this larger bearing must have been for later model m66 gearboxes. Best to check what’s in your gearbox before ordering)
  • Gearbox Input shaft seal -Part# 8675580 – FCP Euro – $15
  • Drive shaft axle seals – Part# 6843481 – FCP Euro – $7 each
  • Modification of existing clutch line – again, from a local supplier with cost unknown TBA

At this point in time, aside from the process of purchasing the required items above, I’ve opened up the M66 box to inspect condition which looks great. The fitting of the LSD looks to be quite straightforward with the only significant consideration being the need to maintain appropriate spacing tolerances when fitting new spline bearings, I think!

Footnote – Some may be wondering why the MFactory helical LSD when the common options are Quaife, Wavetrac, or Gripper.

  • I like to be different. 🙂
  • I found a local distributor.
  • They seem to have some genuine street cred in the performance sector.
  • The price was about 20% less than nearest rival.
  • They claim superior product as a result of manufacturing techniques.
  • I could find no online threads to suggest they are crap, quite the opposite.

I guess I’ll get to find out in a several weeks but in the interim here is a little more info which may be of interest.

mf3

Track day antics!

Laid up for a couple of days with a Winter flu is not much fun, but I have to confess it’s a nice chance to browse the Gumtree Volvo adds and alike. I should be thankful to my wife for many things, the very least of which is the fact that I only own 2 Volvo’s. Heaven forbid, if she wasn’t around there would be no room at my house. Potentially an ugly scenario given that I could fit about 10 cars between the front an back yards. Yep, I’ve thought about it!

I’m inspired by the commitment of Volvo enthusiasts advertisements, the cars that have been dearly cared for, the others which make a statement, like the 240 wagon with 5 litre LS1 that up for grabs at the moment. I feel sad at the lack of love and care shown to some fabulous old girls, and a few of the more modern ones too. I’m horrified by the failure to get the facts right. God knows how many of us are scanning the Volvo Manual Transmission adds for that rare manual transmission. For goodness sake, look at the bloody gear stick before you list it as a Manual transmission, or maybe count the pedals. I’m sure I could rabbit on all day so I’ll leave it with these last two whinges. If it’s a 5 cylinder but doesn’t have a turbo then don’t list it as a T5, it’s not that hard really! and if you’re selling an S60/V70 2001 t0 2003 with and auto transmission that’s acting up a little just come clean, “may need a transmission service” is a nice approach but realistically the following wording would be more appropriate “transmission most likely stuffed – Good luck” 🙂

Moving on, I’ve simply been enjoying my time with the old girl of late, not my wife, the car! I’ve not undertaken any significant work or modification for a couple of months. During this time she’s completed 2 more track days at Wakefield Park raceway and driven me to and from work each day, and I must add, without fault.

The track days were the first opportunity to run the car with some earlier changes including the newly fitted Bilstein B6s, the wheel and tyre package and the NA cams. In a straight line, she’s quite fast! The main straight is around 700mtrs in length. By the time you get to the 400 metre mark you’re at about 160kph and starting to think about backing off as you approach a gentle kink.

Overall lap times are a little less impressive. Firstly the driver, me, knows very little about driving this thing fast on this track, and secondly, the general lack of grip, primarily turning and acceleration.

Given that scenario I spent about 15 minutes with a suitably qualified instructor seated beside me providing some valuable instruction and assisting with improved lap times. Gotta say how beneficial this was, with some immediate improvements in lap times and making it a more enjoyable experience. In my particular instance I’d say there were three issues that made a nice change to the results. I learned to brake much later and harder than I had been doing previously. Also, using the brakes as you turn in across the apex to assist in maintaining grip and finally, positioning the vehicle more appropriately on the track as you approach braking areas.

Coming to understand the limits of the car was a key aspect in making this a far more challenging and enjoyable experience. I guess it probably goes without saying but you have to get to a point where you can trust the car to do what you know it can. When you develop that confidence, then you feel far more comfortable in pushing the limits a little.

In terms of further mods to improve track performance, the fitment of a good set of semi slicks would provide the simplest and most beneficial performance gain from here. I do fear however, that if I start to chase lap times and make this the focus of future mods, the journey will never end. I have to remind myself that this is about enjoying the experience and the car, celebrating the personal involvement and investment, whilst not getting too caught up in the lap times. The truth is there will always be someone out there faster than you, not to mention with a lot more money.

I might add though that it’s also really cool to be able to put the 20 year old Volvo out there and gain some attention, which she does, and most often for the sweet sound of her 5 cylinder growl.

I’ve not as yet had the opportunity to get back on the dyno following the cam change, but figure if I keep posting on this subject then I’ll eventually get to it. Did I notice a change on the track since swapping to the NA cams? I think so, she continues to feel a little more punchy in the midrange.

I’ve little more to add at this time except how much I continue to enjoy getting behind the wheel each day. I’m sensing the M56 gearbox may be feeling a little more weary following the track days but before I get too concerned I’ll put through some fresh oil and re-grease the gear linkages. It’s nothing significant, just feels a little notchy on these cold mornings.

Next step, get back to the dyno and see how she compares to previous results.