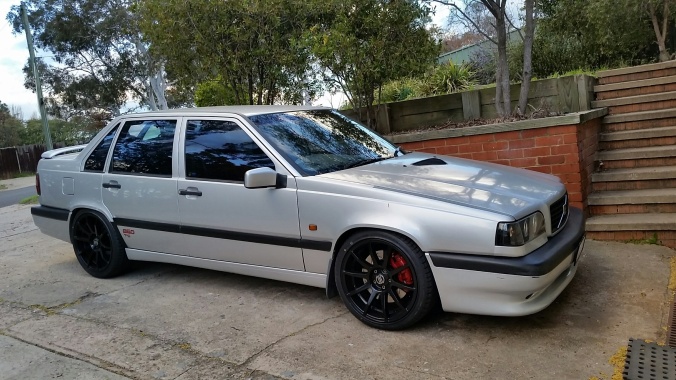
The Return of Kinugawa

Hard to believe I’m still finding things to play around with on this car! It’s been a quite a journey and according to WordPress my first Ovlov94 post was May 2013. The past five and a half years has flown by. If you’d asked me then if I’d still be playing around with this car today, I’m not sure how I’d have responded.

But I guess it’s been the “playing around” with and investing oneself into this car which is partly the reason for this longevity. I feel as though it will be incredibly hard to part with her now! It’s not a thought I can sustain for more than a moment as I consider doing likewise with a C30 or something a little more modern. Who knows where this may all end, and so for now the journey continues.

My previous post on this blog revolved around the Mamba turbo issues, specifically my disappointment with a bearing failure. Not that I blame Mamba per se, clearly they’re copying another manufacturers design, which in my humble opinion requires a little more development to prove reliable under extreme operating conditions. It was the last track day I attended that brought things to an end.

In light of my conclusion and the fact that I still intend to use Ovlov for occasional track day outings, I decided to revert to a journal bearing turbo, namely a Kinugawa TD06 SL2 20g. I’ve used 2 of the Kinugawa’s in the past, a 19t and a 20t. Both of these turbo’s performed beautifully and at no time did I have any reliability issues with either turbo.

The 20g is probably not an ideal turbo for track day outings with boost onset coming in a little later than the Mamba. If Ovlov was reserved only for track day use, then I think I’d have stuck with the Owen Hybrid TD04; great turbo for maximizing power and torque with lower rpm onset and extended power curve. But given this car is also used as a daily drive for several months of the year, I can’t help but want to experience those brief but stimulating moments of acceleration with a sh#t load of boost!

The specific variation of 20g turbo I chose, for those interested, was a unit which would ordinarily be at home on a Nissan RB25det or similar. Given there are so many variations and options on a turbo purchase these days, I’ve listed the specific unit info at the bottom of this post.

As with any significant turbo swap comes the inevitable bunch of changes to make it all work. I had to fabricate myself a 6 bolt exhaust flange adapter to suit the Nissan style turbo. Learning to TIG weld has been a game changer! The rear engine mount also required modification due to a slightly larger compressor side on the new Kinugawa. This would not normally be an issue except that I had to fabricate a new rear engine mount when I installed the M66 gearbox sometime ago.

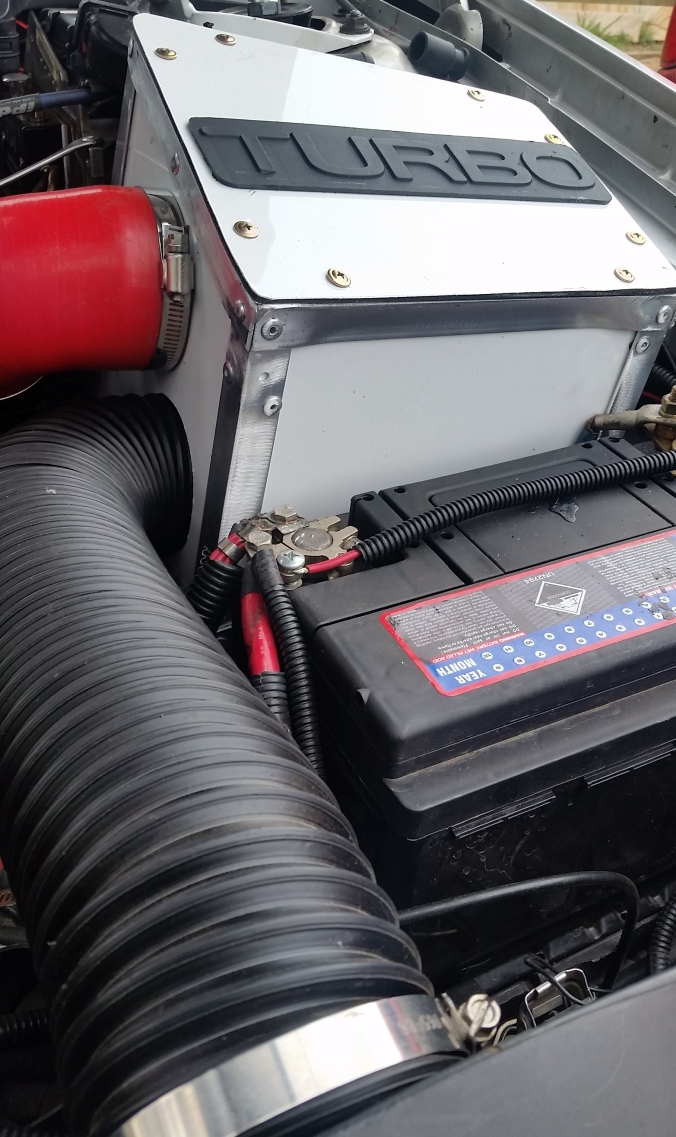
A couple of other changes I threw at her whilst at it included the fitting of a Turbo beanie, something I’d not really looked into until recently, but they seem to make sense. Theory says that isolating heat to the turbine housing whilst reducing under hood engine temps is an efficiency gain. I also took the opportunity to fabricate a new intake airbox that completely encloses the existing POD filter whilst allowing fresh air only into the unit. Again, cooler air intake temps improve performance. This was a fun project and you can see the before and after pics below. Fairly happy with how it turned out. Realistically it’s just a variation on the oem unit but provides the opportunity for higher volumes of air flow.
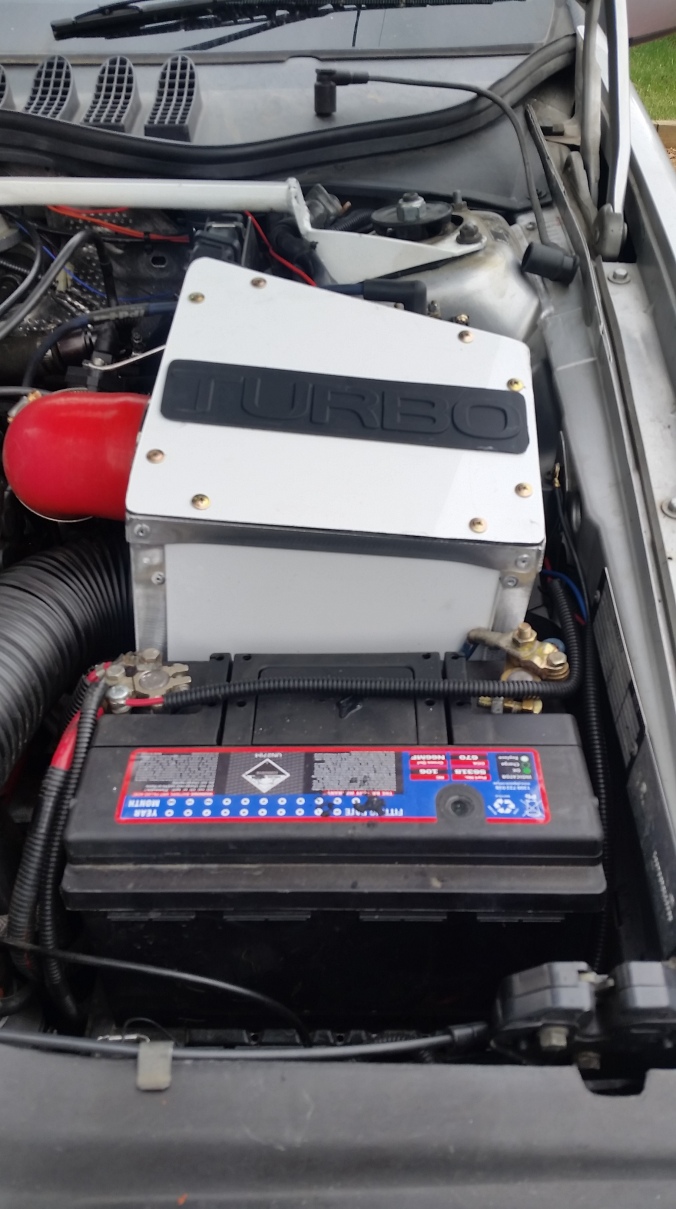
Before photo – 4″ x 8″ Pod to replace OEM intake

20181231_154215

After photo of Airbox – Pod filter enclosed
20181231_154325

When I installed the POD filter to maximize airflow some time back I was always going to be pondering the benefits of doing so. Under hood summer temps in this car are significant, not such a  problem in a Canberra Winter, but right now in mid summer and 36 degree C days, it’s notable.

Having completed the above changes what can I say about the driving experience. The boost onset of the 20G is a little different to the Mamba GTX30171R. It reminds me of the 19t experience. Boost comes on with a blast, it just happens a little higher in the rev range. I don’t feel as though the driving experience has suffered and boost is adequate in the mid range, it’s just that things seems to come on with a greater flurry around 4500rpm, a little later than the ball bearing turbo.

If I had to take a guess, the butt dyno says very similar power output but I reckon if you looked at a dyno curve the Mamba would look less aggressive and more linear.

One thing I did note during a couple of WOT runs was the mixture is running a little lean. I’m not convinced of any issues with the set up as such so have ordered a new tune to suit the build from the Volvo dude in Portugal, Rui. Until then I’ve not been too willing to push her real hard, especially in this summer heatwave.

Well that’s about it for 2018. Let’s see what the new year has in store for Ovlov!

KANDO P/N– 331-02035-156 – ACCESSORIES-001

ITEM NAME– Kinugawa Bolt-On GTX Billet Turbo 3″ Anti Surge, TD06SL2-20G with 8cm Turbine Housing and 9 Blades, Turbine Wheel For NISSAN RB20DET RB25DET

APPLICATION  – Nissan Skyline R32 R33 R34 2.0L 2.5L RB20DET RB25DET Engine,  – Universal application: 2000~3500cc

CHRA/WHEEL SPEC – TD6SL2-20G, – Compressor wheel : 52.3 / 68.0 mm,   (GTX Billet 20G 11+0 baldes / Max boost to 5.0bar), – Turbine wheel : 54.1 / 61.0 mm,   (High flow TD06SL2 / light weight 9 blades)

COMPRESSOR HOUSING   3″ anti surge inlet, – 2″ compressor outlet, – A/R.60

TURBINE HOUSING – 8cm / AR.57, – T3 inlet flange,  6 bolt outlet – wastegate dia : 28.0 mm

COOLING/BEARING SYSTEM – Oil and water cooling – Journal bearing kit, (Performance thrust bearing kit)

ACTUATOR PRESSURE – 1.0bar / 14.7psi

BOOST/HP – boost limited : 2.8bar suggest boost : 1.5bar – max hp : 300~400hp


Out with the M56 5 speed and in with the M66 6 speed with LSD

20161113_150225_resized

The M66 all cleaned up and waiting to install LSD

That’s gotta be the longest title for a post on this blog yet, and in like fashion this particular modification will rate as one of the more significant aspects of Ovlov’s  evolution.

When considering this change I have to admit wavering on the issue for some time. The existing M56H is a great gearbox. It’s completed 260,000klms and 130,000 of those whilst in my care. It remains in excellent working condition and will continue to do so for some time more yet. The M66 won’t give her a better top speed and may not even be as robust as the M56 and so you might wonder why proceed in this direction.

One reason being my concern around availability of another M56 should this unit eventually fail and particularly as she’s been spending more time as a track vehicle. As such when the opportunity arose to pickup an M66 from a V50 t5 for a bargain price, I could hardly refuse. There are increasing numbers of the M66 gearboxes out there and decreasing numbers of M56’s. It makes sense to make the change now and find out exactly what’s involved and have access to further M66 stock if required.

I know that M56 and M59 gearboxes can still be found, but the reality is that they come with the car. i.e you gotta buy an old manual 850 or s/v 70. This is increasingly problematic as it takes considerable resources to find, buy, store and strip parts from these old girls.

The fact that Ford also utilized the M66 box in it’s Ford Focus XR5’s, also known as Focus ST225 outside of Aus, adds to the availability of boxes and associated parts. For example, the Mfactory LSD intended for install in this upgrade is not found anywhere listed for Volvo vehicles, only Ford Focus.

The LSD is an aspect of the upgrade which I’ve been very keen to address and the additional traction will be warmly welcomed. I had learned to manage the limited traction of the open diff in track day events but this has without a doubt, limited the capability of this car. How the newly installed LSD will ultimately effect performance and drive traction will be interesting to experience and I am certainly excited about getting to that point. In terms of road use, it will I hope be a nice change not being caught unaware with sudden changes in direction under hard acceleration. It can be a little scary at times.

And so to kick this all off I’m going to post around this modification in a few stages. This post is also a pre cursor to the actual change and for anyone out there whose already undertaken this swap I’m listening with open ears. I’ve been researching this for some time, at this point the only unknown relates to the fabrication of a new engine mount on the rear passengers side (au). Other than this I believe we are good-to-go.

Given that this is the 2 wheel drive M66 swap, and we are swapping into a vehicle which has an existing manual gearbox, and there is no dual mass clutch plate to be concerned with, and the existing M56H has no inbuilt speed sensor, the process is somewhat simplified.

What is required?

  • A new clutch plate to match the change in the spline on the M66 gearbox. On good advice I’m told that the Sachs SD693 clutch plate can be utilized in conjunction with the existing R series pressure plate.
  • The existing hydraulic clutch line will need to be replaced/modified, as the M66 utilizes a different style of slave cylinder.
  • The gearshift lever assembly will require some fiddling as there are differences in the way existing cable connects to the gearbox, but again, others have been there before me and completed some modification  to existing brackets without too much difficulty.
  • The fitting of the Mfactory limited slip diff will require that the diff bearings be replaced and some new gearbox drive shaft seals installed.
  • The M66 will require an OEM thrust bearing but this is simply because the old is worn out. Not a modification as such.
  • The rear engine mount on the Passenger side (AU) of the engine will require fabrication of a new bracket and mount.

While all of this is going on, long overdue replacement of the sub-frame bushes will take place, a job I’ve been wanting to address for ages 🙂

I thought I’d keep a running tally of items on this part of the project, including links and prices which may prove helpful to anyone wishing to undertake this same modification.

  • M66 Gearbox – 2006 V50 T5 FWD – Sydney Motor Recyclers $80 (yep, it was a bargain buy)
  • MFactory Helical LSD – Suitable for Ford Focus ST225 M66 6 Speed –  Of note, Mfactory only list this unit for the Ford Focus XR5 (AU) or St225 (overseas) but I did confirm it’s compatibility. Purchased from Diff Lab $1000 au
  • Sachs SD693 Clutch plate – Purchase from Rock Auto $70 au
  • Sachs SB60223 Release Bearing and Cylinder Assembly – Purchase from Rock Auto $120 au
  • SKF Differential Bearing x 2 – SKF 32008 xt9/q or National NS32008 – Source from Rock Auto $25 each. (I noted that some M66 gearboxes utilize a larger diff bearing 32010 x. I suspect this larger bearing must have been for later model m66 gearboxes. Best to check what’s in your gearbox before ordering)
  • Gearbox Input shaft seal -Part# 8675580 – FCP Euro – $15
  • Drive shaft axle seals – Part# 6843481 – FCP Euro – $7 each
  • Modification of existing clutch line – again, from a local supplier with cost unknown TBA

At this point in time, aside from the process of purchasing the required items above, I’ve opened up the M66 box to inspect condition which looks great. The fitting of the LSD looks to be quite straightforward with the only significant consideration being the need to maintain appropriate spacing tolerances when fitting new spline bearings, I think!

Footnote – Some may be wondering why the MFactory helical LSD when the common options are Quaife, Wavetrac, or Gripper.

  • I like to be different. 🙂
  • I found a local distributor.
  • They seem to have some genuine street cred in the performance sector.
  • The price was about 20% less than nearest rival.
  • They claim superior product as a result of manufacturing techniques.
  • I could find no online threads to suggest they are crap, quite the opposite.

I guess I’ll get to find out in a several weeks but in the interim here is a little more info which may be of interest.

mf3

Ovlov’s Evolution

The evolution of Ovlov continues, primarily aesthetic changes of late. Aside from this the ongoing task of general maintenance continues with a view to keeping her in prime condition.

In the past couple of months she’s gained a set of budget minded sport bucket seats, some nice new 320mm DBA T4000 front brake disks and project Mu pads, a set of silicone water hoses, and a set of 18″ rims for regular road use.

The Monza car seats were a bargain buy I couldn’t resist and although less comfortable than the original seats, are a much better design and contour for holding one firmly in the seat whilst throwing her around a track. As good as the OEM leather seats are, they are not ideal in this scenario and so the Monza’s are a compromise which I hope I’ll not regret.

20161001_124454_resized

Fitting the existing seat sliders was a bit of a battle but it’s amazing what you can accomplish with an angle grinder and electric drill. The only other issue with replacing the seats is the loss of tilt angle and height adjustment, but I can live with this.

The red rims of previous posts are now fitted with semi-slicks and reserved for track days and though the car actually drives very nicely on the semi’s,  the soft rubber compound and high wear rates don’t make them ideal for regular road use.

As a result I’ve purchased a set of 18 inch 10 spoke rims in matte black to shod her hooves for daily driving. In considering an appropriate wheel the focus was a more aggressive stance which would utilize that maximum wheel width available whilst avoiding significant scrubbing of the wheel arches. In the end I settled for a 8.5 inch wide rim with a 225/40r18 tyre.

20160926_171025_resized

It’s damn near impossible to avoid a small amount of scrubbing when the steering is at full lock but this has always been an issue with other aftermarket 17″ rims I’ve used.

I often felt that the wheel/tyre width on the average 850 looks a little too narrow, even with a 225 tyre on a 7.5 inch rim.. With the 8.5 inch rim and 225mm tyre I feel it’s about as good as I’ll get and gives the car a more solid appearance from the rear view. As far as the above image is concerned, the black wheels never photograph very well, but I’m happy with the outcome.

The ride on 18″ rims with a 40 aspect ratio is a little firmer, but handling a little sharper, which is nice when entering and exiting the many roundabouts within the Canberra road network.

For the radiator hose replacement I chose to lash out and by a Chinese set from the AliExpress site. You can get the full set of K8 hoses which includes all water related hoses for around $100 AU delivered.

20161001_132555_resized

The engine bay looks a little odd with the multitude of colours now but my aim has never been to achieve a perfectly presented engine bay. Mechanically speaking, I’m more focused on performance and reliability. Yep, I do get a little fussy with her outer appearance but most people are never going to look under her hood!

The only other maintenance related change which comes to mind was the installation of a larger cool air intake pipe as pictured below.

20161001_132628_resized

I did have a Pod filter installed for a brief spell but for a couple of reasons I chose to revert to the OEM intake. First reason being that this car with the OBX exhaust and engine modifications is already quite loud under acceleration. The Pod filter just added to this issue, secondly, I personally feel that there is a small loss in performance in hot weather with the Pod filter. In my mind the ideal setup would be a suitable aftermarket cold air intake system but the stuff I’ve looked at is not cheap, hence the do-it-yourself in the backyard mod as pictured, with the aim of eliminating any airflow bottlenecks.

One final minor aesthetic change I made recently was a do-it-yourself sticker applied to the bottom corner of the rear doors. The reason for this was purely vain, it needed something else on the body to work with the red rims at the time.

20160515_102210_resized

This was one of my early attempts, it would help if I could stick the thing on straight. Either way I kinda liked it and they remain on the vehicle in spite of new black rims.

Finally, she’s back to being driven each day which continues to be an enjoyable experience. Other than this, the journey continues and the next bit of her care involves respraying the bonnet and front bumper/spoiler.  Spray painting large panels is not something I’ve ever achieved very successfully, as such I am yet to determine how to move forward with this.

Go the semi-slicks

It’s looking a little like the initial aims of this build may have been lost somewhere along the way, superseded by the joy of driving Ovlov around the local raceway. That’s not to say that the early aims of the project were not met. I feel they were, it’s just that things have changed.

Reality set in somewhere along this journey, and a realization that the joy of unleashing her performance potential was never going to be satisfied on our local roads. Sure, there are opportunities to give her a blast and she’s still fun to drive on the road, but you can’t go seriously quick on the road without taking significant risks.

From the outset, the plan was to restore this old girl and breath some additional life and performance back into her being. That was achieved! The goal that she remain a sleeper has been somewhat lost to a set of lairy wheels, lowered suspension, and hole in the bonnet. The further aspect that she remain a daily drive has been somewhat lost to a range of modifications such as steering, tyre and suspension changes, resulting in a loss of drive-ability.

I do still drive the old girl to and from work with reducing regularity and have to admit that I increasingly like jumping in my old 850 NA sedan with it’s comfortable ride and auto transmission. Maybe I’m just getting old, who knows!

Anyway, the intention of this post, if I can stay on track, forgive the pun, was to talk about the terrific performance improvement at the last track day following the fitment of a set of semi-slick tyres.

Getting the power to the ground has been a challenge with this car. Good tyres were always going to help and in terms of bang for buck lap time performance improvements, I  think this was the obvious next best option. With the change of tyres we went from a vehicle which was fast in a straight line, to a vehicle which could hold it’s own and put down some lap times which were very acceptable in comparison to some modern track day rivals.

The newly fitted tyres are Nitto NT01 semi slicks, 225/45/17. The resulting gain in average lap times was approx 4 seconds per lap. The fastest lap on the Nitto’s was a satisfying 1:14.25, where as my previous fastest lap on the Falken road tyres was a 1:18.5.

There are some very good reviews for these tyres, dry grip generally rated as outstanding. I can certainly attest to excellent performance by way of comparison to a road tyre. I have also driven on them in the wet and felt confident aside from driving across pooled water. Having said that, they are recommended as competition tyres and won’t be using them on the road on a regular basis.

Nt01

Anyone familiar with the Wakefield park raceway knows that there are cars that can go alot faster around that circuit than this old Volvo. A friend of ours on the day was averaging 1:10s in his 360kw Nissan Skyline AWD. A beautiful piece of machinery to be sure, but designed and built to go fast on a race track, such is the performance in these cars that the bit which broke on this day was his seat, snapped off at the base.

There are invariably a broad range of performance vehicles at these events. On this occasion one of the quickest was a Renault RS250. I noted his best lap times were around 1:13. I was impressed to be not too far off the Renault result given that they are always one of the quickest road cars on the track on any given day. Perhaps I should add, affordable road cars.

Oldest son was also having some fun in his purpose built MX5 track car. It may not have many horses under the bonnet but these cars are surprisingly quick and handle superbly. Son was disappointed to be beaten by dad in the Volvo, even if it was approx 2/10ths of a second.

Capturing your lap times is made increasingly easy with a bunch of suitable apps out there to monitor track time, speed performance etc. The app I’ve been using is called Harry’s GPS Lap Timer. If I recall correctly you can purchase this app downloaded to your phone for around $25.

The stats provide you with a bunch of relevant data. The results from my 1:14.25 time as follows. Lap 25/58, average speed 105.1 km/h, max speed 173.9 km/h, track length 2.168 km Sector 1 39.61s, sector 2, 34.64s. How good is that! Harry’s timer also captures a bunch of interesting G Force data which doesn’t mean alot to me at this point.

Screenshot_2016-07-16-18-48-47

I did take the son’s MX5 for a drive and was so impressed by the handling. Turn in is precise and sharp. You point that thing in a given direction and it goes there!  By comparison Ovlov feels like a bit of a boat. I guess the next obvious move in terms of performance improvements would be further work in the handling department.

If there is one thing worth adding to the track day driving experience with this car I would have to say that it is incredibly forgiving. I’ve watched alot of drivers spin their cars, run off, lose control with the tail end swinging from side to side. Ovlov may suffer from under-steer and feel a little floaty, but the tail end always seems to do as is asked. There are no horror surprises for the unwary, and this is partly due to the front wheel drive design, but also the delta link semi independant style of rear end in these cars.

With some further work on handling, if I can get this car to turn in a little better and improve it’s responsiveness to change direction then I think we could chop times down a little further.

Why?

It was a heck of alot more fun getting around that track in a competitive car! Yep, passing other cars is way better than being passed by cars. 🙂

Until next time!

Footnote : Found this video online from one of the track day boys posting his first track experience in his Subaru. Nice footage, he managed to follow me around for a few laps from lap 3 onwards. Interesting to watch this perspective.

Track day antics!

Laid up for a couple of days with a Winter flu is not much fun, but I have to confess it’s a nice chance to browse the Gumtree Volvo adds and alike. I should be thankful to my wife for many things, the very least of which is the fact that I only own 2 Volvo’s. Heaven forbid, if she wasn’t around there would be no room at my house. Potentially an ugly scenario given that I could fit about 10 cars between the front an back yards. Yep, I’ve thought about it!

I’m inspired by the commitment of Volvo enthusiasts advertisements, the cars that have been dearly cared for, the others which make a statement, like the 240 wagon with 5 litre LS1 that up for grabs at the moment. I feel sad at the lack of love and care shown to some fabulous old girls, and a few of the more modern ones too. I’m horrified by the failure to get the facts right. God knows how many of us are scanning the Volvo Manual Transmission adds for that rare manual transmission. For goodness sake, look at the bloody gear stick before you list it as a Manual transmission, or maybe count the pedals. I’m sure I could rabbit on all day so I’ll leave it with these last two whinges. If it’s a 5 cylinder but doesn’t have a turbo then don’t list it as a T5, it’s not that hard really! and if you’re selling an S60/V70 2001 t0 2003 with and auto transmission that’s acting up a little just come clean, “may need a transmission service” is a nice approach but realistically the following wording would be more appropriate “transmission most likely stuffed – Good luck” 🙂

Moving on, I’ve simply been enjoying my time with the old girl of late, not my wife, the car! I’ve not undertaken any significant work or modification for a couple of months. During this time she’s completed 2 more track days at Wakefield Park raceway and driven me to and from work each day, and I must add, without fault.

The track days were the first opportunity to run the car with some earlier changes including the newly fitted Bilstein B6s, the wheel and tyre package and the NA cams. In a straight line, she’s quite fast! The main straight is around 700mtrs in length. By the time you get to the 400 metre mark you’re at about 160kph and starting to think about backing off as you approach a gentle kink.

Overall lap times are a little less impressive. Firstly the driver, me, knows very little about driving this thing fast on this track, and secondly, the general lack of grip, primarily turning and acceleration.

Given that scenario I spent about 15 minutes with a suitably qualified instructor seated beside me providing some valuable instruction and assisting with improved lap times. Gotta say how beneficial this was, with some immediate improvements in lap times and making it a more enjoyable experience. In my particular instance I’d say there were three issues that made a nice change to the results. I learned to brake much later and harder than I had been doing previously. Also, using the brakes as you turn in across the apex to assist in maintaining grip and finally, positioning the vehicle more appropriately on the track as you approach braking areas.

Coming to understand the limits of the car was a key aspect in making this a far more challenging and enjoyable experience. I guess it probably goes without saying but you have to get to a point where you can trust the car to do what you know it can. When you develop that confidence, then you feel far more comfortable in pushing the limits a little.

In terms of further mods to improve track performance, the fitment of a good set of semi slicks would provide the simplest and most beneficial performance gain from here. I do fear however, that if I start to chase lap times and make this the focus of future mods, the journey will never end. I have to remind myself that this is about enjoying the experience and the car, celebrating the personal involvement and investment, whilst not getting too caught up in the lap times. The truth is there will always be someone out there faster than you, not to mention with a lot more money.

I might add though that it’s also really cool to be able to put the 20 year old Volvo out there and gain some attention, which she does, and most often for the sweet sound of her 5 cylinder growl.

I’ve not as yet had the opportunity to get back on the dyno following the cam change, but figure if I keep posting on this subject then I’ll eventually get to it. Did I notice a change on the track since swapping to the NA cams? I think so, she continues to feel a little more punchy in the midrange.

I’ve little more to add at this time except how much I continue to enjoy getting behind the wheel each day. I’m sensing the M56 gearbox may be feeling a little more weary following the track days but before I get too concerned I’ll put through some fresh oil and re-grease the gear linkages. It’s nothing significant, just feels a little notchy on these cold mornings.

Next step, get back to the dyno and see how she compares to previous results.


NA cam swap

Front engine view sept 13I’d resisted undertaking the NA cam swap modification for 2 years. During that time I’ve read more on this particular subject via forum posts etc, than just about any other Volvo 850 turbo modification, and I’ve read a lot of stuff!

Researching the subject is a little like looking through the proverbial haystack to find the  needle. That needle being some valuable accurate information relevant to setting up the NA cams and expectation around performance improvements.

Digging through that haystack will uncover a multitude of information that is just not right! To add to this there are many thoughts and opinions as to what is helpful, unhelpful, needful, unnecessary etc etc. For example the belief that there is something special about 93 model NA cams. There just doesn’t seem to be any substance for that belief.

Before I launch into my own experience it’s worth noting that the performance gains from this modification are not huge. You may even end up with a performance loss. 😦 There are too many variables and variations of engine/turbo combination to be able to say do this and you will definitely get that.

Changing the cams may provide the potential to improve HP and torque but if you don’t get the cam timing right it won’t serve any benefit. If you’re reading this then you’ve probably already delved into the conjecture around valve overlap and associated advantages and disadvantages, which is all related to cam timing.

The bottom line for knowing if you got it right may well be the need to compare HP and torque results from a dyno. And how many of us have a dyno in our backyard. Only dyno I have is in my back side and it’s incredibly inconsistent.

Before concluding that I’m saying the mod is not worth pursuing, I’m not saying that at all. I’m a great believer in squeezing out lots of small performance gains for the greater good. What I am saying is that you might just need to work a little harder at fiddling with the variables. It’s not like bolting in a new inter-cooler, where you’re gains are a given.

In my humble opinion the most useful document still available on the web on this subject is the IPD cam timing tool setup guide. The relevant points to pay attention to on this document are the variations in duration, opening and closing times of the NA cams compared to the turbo cams. When installing the NA cams it is helpful to set them up with a same or very similar overlap and timing settings as the turbo cams you just removed. This in effect requires the intake cam retarded by 4 degrees from the factory base setting and the exhaust advanced 5 degrees from factory base setting. This is the starting point.

The reason I highlight this point is the volume of references out there to initial timing settings which have been plucked out of god only knows where.

If you’re running a stock engine/turbo setup then you may like to play a little with the timing settings from here but this is probably as good as you ‘ll get. If you are running a larger turbo with associated tune then you can play a little more with an expectation of gains. Big turbo, high boost, intake can be retarded as much as 7.5 degrees. To retain same overlap, exhaust could also be pulled back a little to maintain same overlap.

The whole valve timing overlap thing is quite frankly confusing! ARD have a good easy to understand article on this subject. Read this for some background. Some say that higher performance engines can benefit from overlap, but the general consensus seems to be that it’s not helpful in TD04 turbo applications.

In my install I’ve chosen to retard both cams slightly but maintain the overlap, or lack thereof. In this way hopefully pushing the power and torque up the rev range a little. Intake is set to -5 degrees and exhaust +4 degrees (from the factory base setting)

Without putting this on a real dyno, my backside dyno assessment over the past 4 weeks would lean toward being a little more punchy in the mid range, but possible slight loss of power at the top end. It’s actually very hard to say for sure, and as I say have been driving the car for a few weeks before leaping to conclusions.

Was the mod worth it? Definitely! it’s been a great learning experience, and the bottom line for me always goes something like, give it a go, otherwise you’ll never know.  Worst case scenario I can pop the turbo cams back in.

I do intend to put this vehicle back on a real dyno at some stage in the next couple of weeks and will post the results. Provided I’ve not gone backwards in maintaining a nice power curve then I’m pretty happy with the current setup. She still goes like a scalded cat and quite frankly inspires one to want to drive too fast. Hey, but I guess that’s the benefit of track days at the local motor sport park.


Till death do us parts

The two and half year modification journey with this vehicle continues and as such I continue to replace a bunch of parts and upgrade a few not-so-big items as I  maintain and improve certain aspects of this vehicle.

I’ve owned Ovlov for 7 years now and have told my kids they’ll need to bury me in this car! Having said that there is the odd day when I wonder if I should settle down and get myself a daily drive more suited to an aging father of three, perhaps a Toyota Camry or similar?!

Sure there’d be some gains in quietness, comfort and economy, but I’d seriously miss the 5 cylinder growl, stupid acceleration and the smell of burning rubber. I’d miss the lack of traction in 1st and 2nd gear, the way that the car will wander in 3rd and 4th under hard acceleration, and the way in which the steering wheel will occasionally want to rip out of your hands. I’d miss the somewhat noisy exhaust note, the pssst of the BOV and flutter of the turbo, I’d miss it alot!

I do actually drive a Toyota Camry company vehicle on occasion and it does most things very well but I guess the bottom line from my perspective would be to say that it has no soul.

As a saleable entity Ovlov is probably not worth more than a few grand on the open market, and given my significant financial and personal investment of close to $10K and a bunch of hours I’ll never see again, I fear it would be a loss leaving me with regret. Yep, when I go, she’s coming with me! Completely stupid to think that I could find true happiness in a Camry!

We’ve clocked up 45,000klms since the rebuild and she’s continued to perform remarkably well with no catastrophic issues to report, though I have and continue to undertake a whole bunch of changes due to minor failures or ongoing maintenance. I’m going to itemize a few of these maintenance issues as it may prove helpful to someone, somewhere one day.

Steering rack and pump – I tolerated the feel of the steering in this car for several years knowing that it didn’t quite feel right! Having owned and driven several other 850s the steering in this vehicle often felt vague and light, and did not inspire confidence at higher speed. To add to this it would tend to pulse a little when turning corners at higher speed. To describe that aspect of the issue more accurately would be to imagine the power assist would reduce and increase, reduce and increase in such a way that the steering would feel light then heavy, light then heavy, all in the space of a few seconds of turning.

First approach was to change the steering pump which eliminated the pulsating issue immediately. The somewhat vague feel remained, so on the advice of others I changed the front tow out a little, just the one turn on each side. This made for a nice change and also affected the way the car would turn in, it was a win on both fronts, steering felt better at lower speeds < 80klm per hour, but at high speed the vagueness remained.

In the course of time I had the opportunity to grab another rack from a vehicle I had known and driven and swapped it out for the t5 unit. That change brought the saga to a close. The steering feels far less vague at speeds in excess of 120klm now, providing a degree of driving confidence which was lacking. All is now well and I’m satisfied that this is about as good as I’m likely to get in a 20 year old car.

Air Intake Box/Pod filter and BOV – Until very recently I’d always run the standard airbox with a minor modification allowing for some additional airflow. I’d resisted the boy racer POD filter mod in an effort to keep the engine/airflow noise down and maintain the stock look under the bonnet. To add to that argument, the stock airbox is apparently good for up to 400hp so it was never really an issue from my perspective. However, in a fit of adventurous madness I decided to slap on a suitable Pod filter in place of the airbox for a bit of fun. Determined to refrain from presuming the car would perform any differently I drove her for a couple of weeks before drawing any conclusions on the matter.

Untidy looking pod filter installed makeshift fashion.

Untidy looking pod filter installed makeshift fashion.

Conclusion 1 – With Pod filter installed you can now hear all of the coming and goings of the boost and blow off valve much better. This led me to suspect that the recirculating BOV was not performing as well as it should. The original aftermarket BOV was an Ebay cheap and cheerful unit with adjustable spring load and vacuum managed pressure release. With the POD filter now installed it sounded like the pressure release at low boost was too great, and at high boost, was not great enough. Sure, you could manage the high boost pressure release point by dialing out the adjustable spring tension, but the low boost pressure release is somewhat at the mercy of the vacuum pressure and BOV efficiency and design.

When driving at low throttle levels with boost pressure at close to 0 Psi the BOV piston could be heard baubling excessively, probably not the best word, effectively releasing boost pressure that could well do with staying in the system at such low levels. At high pressure, i.e shutting throttle at 15PSI +, too much air was remaining in the system causing turbo flutter. Turbo flutter sounds great but in reality may be indicative of inefficiencies in the setup. You are always going to get some flutter, but probably don’t want too much of it at higher rpm and boost levels. Nice write up on the issue here.

GFB - Go Fast Bits T9301

GFB – Go Fast Bits T9301

Anyway, at risk of rattling on about this issue until the reader is completely bored let me jump to the conclusion. I purchased myself a same style recirculating BOV from a company that seems to have some kudos when it comes to selling a decent BOV. GFB or Go Fast Bits obviously pride themselves on selling a product delivering levels of performance people like myself would hope for. The change in performance was immediately noticeable with a small improvement in low end pick up and a big improvement at the point of gear change at high boost. The actual process of releasing air through the BOV at high pressure sounds much cleaner, sharper and there is a nice level of boost maintained as we throw into another gear i.e. reduced turbo lag. Well done GFB, and these dudes are Aussies too.

Conclusion 2 – I’m convinced there is a performance improvement with the Pod filter installed. That improvement seems noticeably evident at a given point of throttle position, usually under heavy acceleration, commencing around 3,500rpm+. The reason I feel quite confident in saying that was an increase in the ease ability to spin up the front wheels in 2nd gear, and occasionally 3rd. Given that the Pod air intake is somewhat less restricted then perhaps this is the case, it certainly feels as though it breathes a little more freely now. Realistically I can’t prove the above but will stick with the Pod filter for a little longer. The big issue from my perspective is that Air Intake temperature will increase as a cold air intake hoseresult of drawing hot air from the engine.  This issue may well counter any gains made from breathing easier. I’m told that the standard airbox airflow can be improved by replacing the front section of the intake pipe with something a little more substantial i.e. some 80mm flexible aluminium pipe will probably improve things a little.

Upper Engine Mount – After 6 years this was in very poor condition. I’m figuring that this was overdue for replacement anyway. If you are an 850 Volvo tragic living in Australia I can recommend the service and supply of parts from a local guy, Ash from DVS Performance. He is always a valuable source of information and very helpful.

Fuel Pump – This was a complete surprise, hopped in the car one hot afternoon and there was no fuel pressure at all. A quick change to an old OEM pump sorted the issue but given that I’d only covered 45,000klm since replacement was a little surprised. The failed unit was a Walbro GSS340 (Bigmouth) pump. Having tested the pump outside of the tank now it seems to run fine but I’m not willing to risk it. In haste I ordered a afford ably priced GSS342 Walbro pump from an Ebay supplier only to discover that the replacement unit, though labelled Walbro, may actually be a cheap Chinese imitation. The problem is that I can’t prove that statement. Apparently there are a bunch of pumps out there being marketed as Walbro but are in fact not. If you are interested to discover some further info on this issue you can read more here.

Rear Tail lights – Some months ago I picked up a ’96 NA 850 to use as a backup vehicle. The car was in nice condition overall, aside from the blown head gasket at the time. The tail lights on the earlier 850s are quite square in comparison to the later model 850s. The designers were obviously trying to soften the back end a little which I believe worked quite well. Most people would not likely notice much difference but when fitted on the silver t5 it definitely softens the tail end making it look a little less boxy. It’s an easy swap and I felt it was well worth the effort. The following pics show the differing styles.

Early Style Lights

Early Style Lights

Later Style LIghts

Later Style Lights


Lower Control Arm Bushes –

Given that I’d had so mucControl Arm Bush Replacmenth fun with the recent track day and keeping in mind that I’ll be keen for more in the days ahead, I felt that it would be worth investing some sweat into this job. I was always a little reluctant to attempt this project and looked at replacing the complete lower control arm rather than the bushes alone. Only issue is that in Aus the cost of replacing the whole arm is prohibitive compared with the $40 to buy a set of bushes. I’m not going to go into too much detail but if you have a bench vice, a range of sockets, a hammer and a can of WD40, this job is not that hard. The process involves using a socket with a slightly smaller diameter than the bush to press the old bush out using a vice. I was pleasantly surprised and happy to know that she’s now sitting on a nice new tight set of control arm bushes.

Performance Brake Pads – Following the track day event it was clear the other issue to address besides lack of traction was the loss of braking performance as the day progressed. This vehicle presently has the 320mm Volvo front disks installed and as such should be more than adequate for some track work.  The diminished performance from the brakes felt a little like the pad bite was reduced requiring some additional braking effort. Interestingly after a few days of road driving the brake performance returned to normal. Easiest approach to this issue was to throw on a set of Project MU NS400 pads. We’ll find out soon how these hold up.

Hard to believe that I still have a wish list for this vehicle and am intending to replace a bunch of other parts in the near future. I’ve called it my Christmas Holiday Maintenance wishlist.

  • Full aluminium radiator as supplied by d088se
  • Front struts to be replaced with Bilstein B6 Sport shock absorbers
  • Timing belt and serpentine belt
  • Performance leads and distributor cap

I’ve also managed to get my hands on a real cheap set of 17″ wheels fromxc60 an XC60. These are 7.5 inch rim and will work perfectly with a set of semi slicks for future track day events. The wheels require some minor modification to the hub diameter but nothing too hard. Will be very interested to see if I can improve front wheel traction with some slightly wider wheels and semi slick tyres.

Happy Holidays!


Track Day (video)

It’s been a long time coming but I finally took the opportunity to get this ol’ girl out for a track day at the local motorsport park, Wakefield Park Raceway.

She’s not a serious track day setup but I did invest a little time and effort in preparation.The big brake modification completed several months ago was the first of those changes. The fitting of some 17″ rims to allow the brake modification, some adjustable camber bolts and tinkering with camber and tow out would just about sum up the preparation for the outing. Oh, and I did change the brake fluids!

For a newbie like me the day was a serious learning curve in many ways. Not only coming to terms with driving this thing at high speed on an unknown surface but how vehicle setup affects the handling and performance in significant ways.

Everyone says that a track day is about fun and the personal challenge, but when the rubber hit’s the road it all of a sudden gets alot more competitive. Not such a good feeling watching a multitude of cars pass you by and it’s serious pain getting stuck behind someone that’s just a little slower than yourself. As I said, you tend to become quite competitive quite quickly and it invariably becomes a challenge to go faster than someone else on the track. By the end of the day you’ve established a wishlist of future mods to make this thing go harder and faster!

In the end I felt that the day was more about the experience than the car setup. I reckon a more accomplished driver could shave a bucket load off my lap times in this old girl. Developing some confidence in the braking performance, learning braking points, practicing corner approach and exit speeds were the focus for the day.

Overall the car handled great, considering that it has a set of very ordinary road tyres on 6.5 inch rims, I was impressed by the vehicle balance. There is a degree of under steer but overall it was very good. On the other side, there were only a couple of occasions where I thought I was going to lose the tail end through over steer.

The big issue for the car was traction, could not get enough of it and that was a significant frustration. I love the power and torque that this thing produces but 235Kw and 530Nm just doesn’t work that well without an limited slip diff or similar and unless I can improve the traction it’s going to be a frustrating activity. This would need to be the focus of future modifications.

I can do a couple of relatively easy things to help address this, wider rims and sticky track day tyres will help. Ultimately however she would require a gripper diff or Quaiffe to maximise improvements. One could also throw a bucket load of money at some further suspension modifications too but this is where I get nervous, as a daily drive I would like to retain a small amount of comfort in my suspension.

Other than this the engine performed faultlessly, the Owen Developments turbo is a super little unit for this kind of performance, the brakes did get a little spongey by the end of the day so I need to see what’s going on here, hopefully nothing significant. The one area I had been concerned about prior to the day was steering feel at high speeds, it often tended to lose some feel and was light at high speed. I’m guessing my camber and tow in adjustments were part of the resolution to this issue as it was not a concern at all.

The video below is 4 lap excerpt of one of the 15 minute sessions. In this video I get passed by my son in his R33 Skyline which is his track day car and significantly modified for such, the other vehicle which passes me is an R35 Skyline which as you know is a rocket ship on 4 wheels, that thing had so much grip it was ridiculous. No I don’t have Skyline envy, not yet anyway!

If you love the growl of the T5 engine you should definitely turn up the audio, that’s the best bit! Hard to gauge speed watching a video but generally reached 160kph+ at the end of the main straight. Lot’s of squealing from my skinny little road tyres too!

The Day of Reckoning – Dyno Day

It’s been quite a while since I posted and much has changed.

Several months back I had the urge to try a different turbo, an Owen Developments TD04 hybrid unit developed specifically for the 850 series Volvo’s. That process of supply, installation and fine tuning, I’ll call it fine tuning but in reality is more about things working properly, has taken til now to produce a result that I am satisfied with.

Having spent so much time and focus on the Kinugawa 19t and 20t turbos I guess some might be wondering why the change. Firstly, it’s worth mentioning that I think the Kinugawa 19t and 20t units are great bang for buck, and more importantly, reliable. I was always delighted by the performance of the vehicle when fitted.

If there was a noteworthy issue with the Kinugawa units it would relate to boost onset and air flow rates at higher RPM. The Kinugawa units would have provided an improved HP/torque curve if the boost onset was not as sudden and air flow was extended into the higher rev range. This can be altered at the turbo itself but requires the impeller to be clipped, not the sort of thing we can do in the home garage. Well, you can try if you like but I’m sure it will all end in tears.

In the case of the Owen Developments Hybrid unit, it is modified in such a way to create a small amount of lag through impeller clipping, supporting an increased air flow in the upper rev range with a larger compressor wheel. This evens out the power delivery significantly and though the vehicle may not feel as fast as a result of the Kinugawa’s massive surge of boost, I am satisfied that the car is significantly quicker as a result of holding boost better and improved air flow into the upper rev range.

The Owen unit also utilizes a couple of other noteworthy features, particularly the change from journal bearing to ball bearing. This affects low end pick up noticeably and the car is far happier to pull in some boost in the lower rev range making it feel just that bit more responsive.

I never did put the car on to a Dyno with the 19t or 20t which I’m a little dissapointed about, but at least I have now.  Any future changes to the performance of the vehicle can be noted and compared to current dyno charts.

The whole Dyno experience was great and ESP Racing in Queanbeyan have a great service where they will pop the thing on the dyno for you and provide a bunch of valuable information.

Having spent a considerable amount of time working on this car over the past 18 months I was quite excited at the prospect of seeing the results of my labour. Before I launch into some figures, I know that you can build faster, bigger HP Volvo’s; it was never about max HP, but restoring a car I love to a performance standard which would provide a spirited driving experience and I had to be able to do it all by myself in the backyard garage, no dyno tuners or mega fiddly upgraded ECU systems. Finally, the car had to remain economical enough to keep as a daily drive.

Dyno day was quite warm at 28 degrees C (82 F). For safety sake I turned the boost down a little to minimise a very small issue with detonation highlighted by the first dyno run, though I was assured that it was not significant and unlikely to be problematic. We reported on 2 runs and both around 230kw (310hp) at the wheels.  According to a trusty little crankshaft horsepower guesstimator for FWD manual gearbox vehicles, that’s around 265kw (360bhp) at the flywheel. The reason I explain it like that is to highlight the power increase over the standard T5 and for comparison with your average road going vehicle.

The 94 850t5 came standard with 166kw, that’s an increase of 100kw which puts the car into a nice performance category of vehicles producing in excess of 100kw per litre @ 115kw/litre.  For example the 2012 Nissan GTR Godzilla produces 106kw/l with it’s twin turbo v6 motor.

We can also now compare performance to other vehicles with the Kw/Tonne measure, giving it an effective value of 183kw per metric tonne. This is an AU measure but can be compared to vehicles like a 2014 GM Holden HSV E series R8 clubsport at 184kw per metric tonne. (AU car and AU measurements) Which has a whopping great 6.2 litre GM donk producing 325kw and 550nm of torque.

Not bad for a 20 year old Volvo t5 which you can build in your backyard.

Having said all of that it’s worth remembering the very wise words as quoted at auto-ware.com “Many people mistakenly think peak horsepower or peak torque is the primary objective of performance engine parts. However, a single number means very little. Your goals should be the shape and location of the power curve. Basically, these goals have to do with the working RPM range of the engine and how the torque curve fits within that range”

This statement sums up the reason for the switch to the Owen turbo…..we can hit a big HP number but where in the rev range is maximum hp achieved and how long is it maintained. Where in the rev range is max torque achieved and is it effective at that point.

Back to the dyno results; the big surprise for me on the day was the torque figure, which was 550nm (406 ft lbs) @ 4000 rpm. I’m aware that the T5 engines produce excellent torque but was genuinely surprised at that level of performance. 4000rpm is a nice point to achieve max torque, not too low, saving the engine from being too heavily loaded too early, and not too high, making it effective in terms of performance driving.

Other valuable info gained on the day –

  • Duty cycle of the Bosch green injectors indicated that they were operating at 90%. This is I am told about as close as you want to push them to their limitations.
  • Dyno results were obtained @22.5 psi manifold pressure peaking at 4,250rpm.
  • AFR figures reported on the dyno were spot on with my AFR gauge which indicates that it’s running a little rich at WOT.
  • A small amount of detonation was reported but it was felt that slightly better quality 98 octane fuel would be enough to resolve this issue; apparently not all 98 fuel is the same.

The target HP at the outset of this project was 300bhp so overall I am very happy with the result and particularly the lineal nature of the power curve allowing the vehicle to hold HP until rev limiter cuts in ; this would not have been evident with the Kinugawa units in their standard form.

For those interested I’m posting Dyno charts below.

Chart 1 Hp and Torque results – 300+ whp 5,000rpm to 6,500rpm,  550nm@4000rpm

Hp and Torque

Hp and Torque

Chart 2 Hp and Manifold Pressure – 22.5psi @ 4.250rpm drops to 18psi @ 6500rpm

Dyno HP Boost

Chart 3 Hp and Air Fuel Ratios – 10.5 to 11.0 from 4000rpm to 6,500rpm WOT

Dyno HP AFR

Chart 4 HP and Injector Duty Cycle – 90% between 4,500rpm and 6,500rpm

Dyno HP Injector DC

Video from my crappy Samsung phone, sorry about that! Anyway, it’s all about the noise.